
Update 03/01/26
Live Foods
Live foods are vital to the good health and nutrition of aquarium fish. They are what fish eat in nature, and a necessity for successful breeding and raising the fry. Here below are the live food cultures I currently offer for sale, and instructions for culturing and using these and other live foods.
The Four Nematodes: Micro Worm (MW) - Banana Worm (BW) - Walter Worm (WW) - Vinegar Eels (VE)
These four nematode worms are indispensable as first or second foods for the fry of almost all freshwater aquarium fish. They are simple to culture and maintain and all but the vinegar eels get started very quickly. The MW, BW and WW are all cultured on solid medium like oatmeal, and the VE are cultured in a jug of cider vinegar and water.
They differ mainly in terms of size, reproductive rate, and how long they stay alive in water. The differences are not visually apparent at the level of individual worms. They become apparent at the level of a whole culture.
You should always plan ahead and have cultures going before fry arrive, especially with vinegar eels that usually take four to six weeks to get going. Once a VE culture does start producing though, it can last up to a year! With little to no maintenance required, it is a good idea to just start and keep a jug or two of vinegar eels running just in case.
All four have about the same high nutritional value, a close second in many respects to newly hatched baby brine shrimp (BBS). The comparison table here below summarizes the important differences. If you are hatching really tiny fry like bettas, you want walter worms and vinegar eels. You can start larger fry that are still too small for BBS right away on banana worms or micro worms. Micro worms are also good for fry growing out and even smaller fish like neons, juvenile guppies, or badis.
Nematode Comparison Chart
| Species | Relative Size | Doubling Time |
|---|---|---|
| Micro Worm | Large | Longest |
| Banana Worm | Medium | Fast |
| Walter Worm | Small | Fastest |
| Vinegar Eel | Small | Very Slow |
Micro Worm - Banana Worm - Walter Worm - Vinegar Eel Cultures For Sale. Two, Six and Ten Ounce Cultures Available.
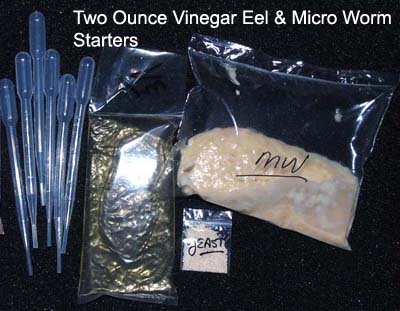
Two Ounce Starters
These low cost starters are available for all four nematodes: micro worms, banana worms, walter worms and vinegar eels. The vinegar eels take four to six weeks to get going well, and the micro, banana and walter worms at least one week in a sandwich-size container.
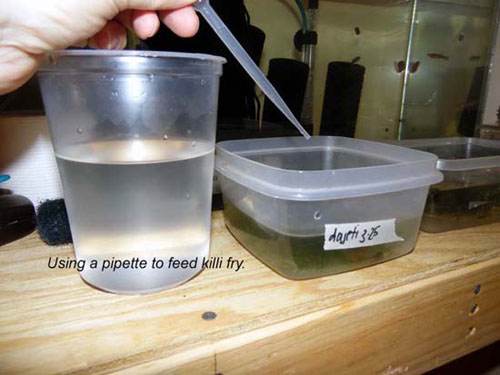
All cultures come with a packet of yeast to help start up, and pipettes that can be used to feed the worms to your fry. Culture instructions with pictures are available on this page for easy reference. Two ounce starter pricing is here below:
Two Ounce Starter Culture Pricing - Shipping Cost Combined On Multiple Purchase
Pips = Pipettes
BW = Banana Worms
MW = Micro Worms
WW = Walter Worms
VE = Vinegar Eels
| Species | Pips | Price | Ship | Item Code |
|---|---|---|---|---|
| Choose 1 of BW - MW - WW - VE | 3 | $4.95 | $4.75 | 1C |
| Choose 2 of BW - MW - WW - VE | 3 | $6.95 | $5.00 | 2C |
| Choose 3 of BW - MW - WW - VE | 4 | $8.95 | $5.25 | 3C |
| Choose 4 of BW - MW - WW - VE | 6 | $10.95 | $5.45 | 4C |
Six Ounce Quick Start Culture
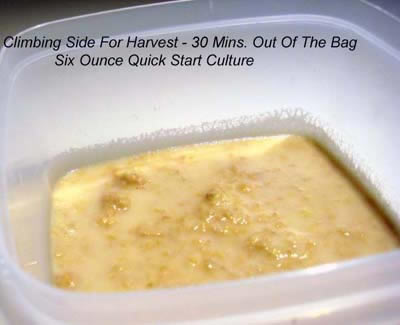
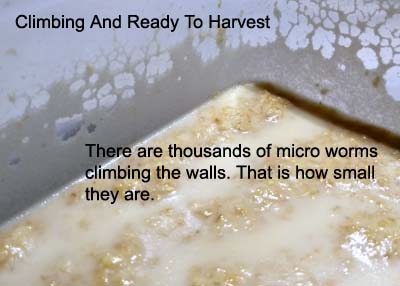
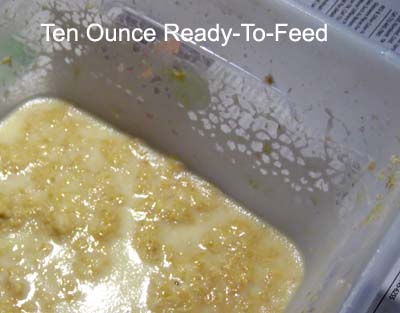
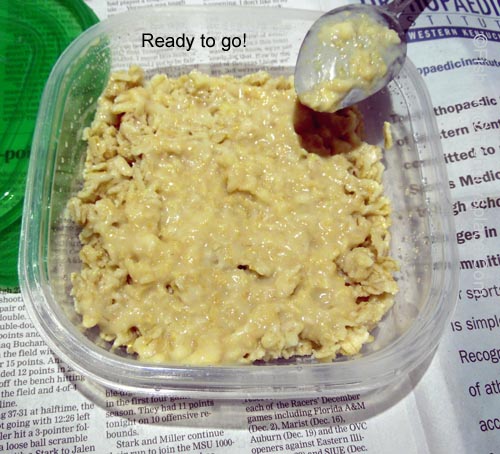
This is a larger culture used to start multiple mother cultures OR as shown below, be used out of the bag as a medium Ready To Feed (RTF) culture so you will not have to wait a week to feed those hungry fry.
The image to the right was taken 30 minutes after a quick start culture was placed in the container. The worms are already climbing the sides and ready to feed with the swipe of a finger. While you are feeding from these mature cultures, you can take a couple spoon-fulls and start a new mother culture going per the very complete instructions you get when you purchase your culture. This culture has simply been poured into an empty container. For even more versatility you can pour it over a quarter to half inch of cooked oatmeal and start a culture while feeding from it!
Six Ounce Quick Start Culture Pricing - Shipping Cost Combined On Multiple Purchase
Pips = Pipettes
| Species | Pips | Price | Ship | Item Code |
|---|---|---|---|---|
| Micro Worms | 6 | $12.25 | 0.00 | QM |
| Banana Worms | 6 | $12.25 | 0.00 | QB |
| Walter Worms | 6 | $12.25 | 0.00 | QW |
Extra Large Ten Ounce Ready-To-Feed
This culture is over a half pound of mature mother culture ready to feed as many fry as you have. You can feed from these very shortly after set-up, and there is plenty to start a backup or two as well. The culture comes in two, 5 ounce bags that are the working upper portion of one of my shoe-box mothers transported to your fish room.
Extra Large Ten Ounce RTF Culture Pricing - Shipping Cost Combined On Multiple Purchase
Pips = Pipettes
| Species | Pips | Price | Ship | Item Code |
|---|---|---|---|---|
| Micro Worms | 6 | $15.95 | Free | XM |
| Banana Worms | 6 | $15.95 | Free | XB |
| Walter Worms | 6 | $15.95 | Free | XW |
How To Culture Micro Worms - Banana Worms - Walter Worms
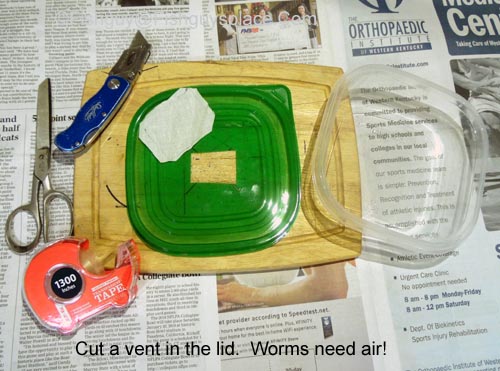
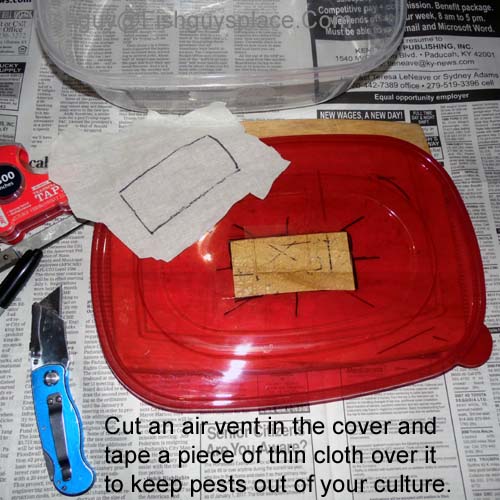
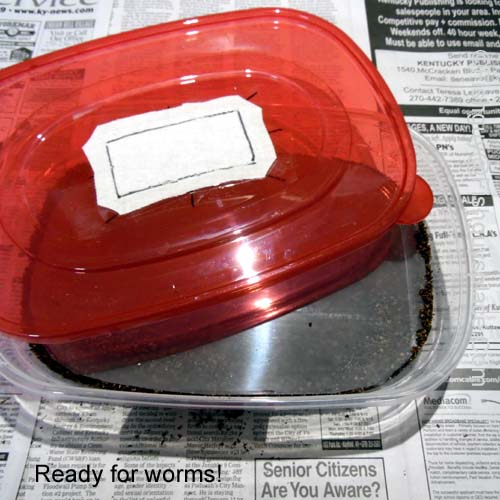
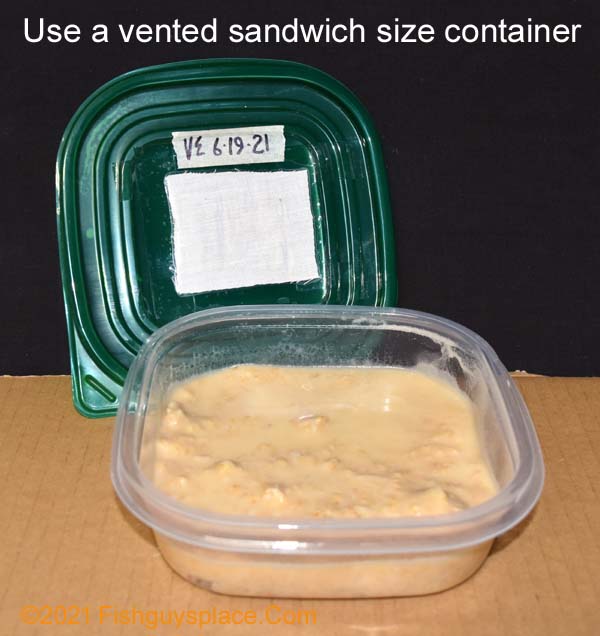
Begin by preparing a container for your culture. Here I use a sandwich size plastic container and cut a rectangular vent in the lid, covering it with thin muslin cloth to keep pests out. The cloth square is taped in place along its edges.
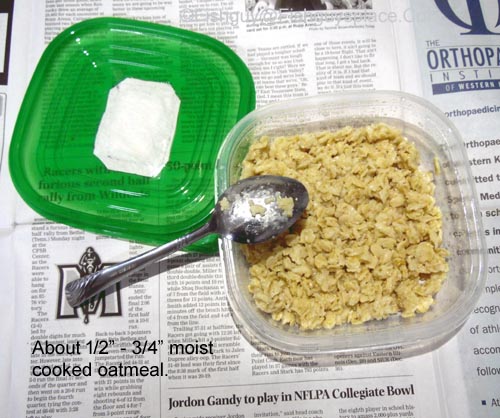
Once the container is ready, put about 1/2" to 3/4" of cooked, COOLED, oats in it. They should be shiny-wet but not soupy. Oats that are too dry will mold. I prefer the Old Fashioned oats that cook for five minutes because they hold up longer than the instant. Some use mashed potatoes or even a slice of bread. Many sources of carbohydrate will work.
NOTE: These instructions are based on using a two ounce starter. If you have a larger amount of starter or a Ready To Feed (RTF) culture, then use a larger container. Size it so a 1/2" of oats topped with your starter brings you to less than an inch total depth. You always want more surface area and not too much depth.
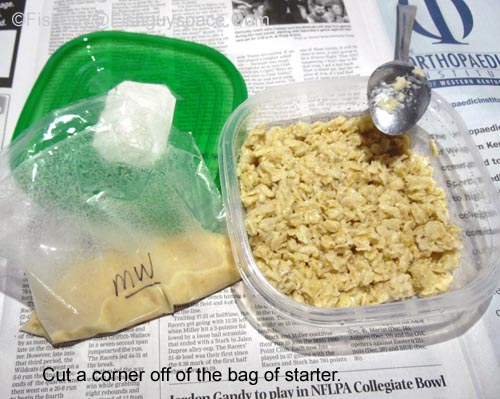
If you got your starter from me it will be sealed into a plastic bag. This happens to be micro worms. The easiest way to get the starter into your container is to snip off one corner and then pipe it out like cake frosting.
Starter placed on medium. I always ship a little extra so no worries about the small amount left in the bag, just toss it.

Your culture is ready to close up and put on a shelf somewhere out of direct sunlight. A cool place in the room temperature range works well. They will be fine in any temperature you are comfortable in. They toleratecold better than heat, and a culture will cycle faster in higher temps, shortening it's useful life.
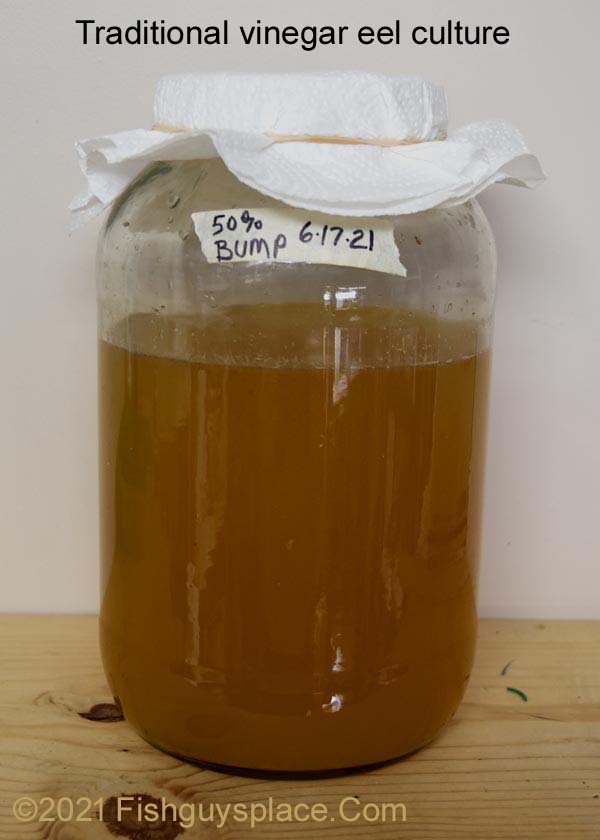
How To Culture And Harvest Vinegar Eels
Vinegar eels are by far the easiest live food to culture. I've
got jugs that have been working for more than a year. To start a
culture, rinse out a gallon jug and fill it to where it begins to
narrow with a 50/50 mix of cider vinegar and dechlor water.
04/09/24 I have found that using pure cider vinegar, without the
water cut, makes my large, one gallon cultures last longer and
does not in any way injure the worms or cut production.
Then add four or five slices of peeled apple. The skin can contain
pesticides. Finish by adding the starter and plugging the jug with
fliter floss or rubber-banding a thin cloth in place to keep out
flies and allow air in.
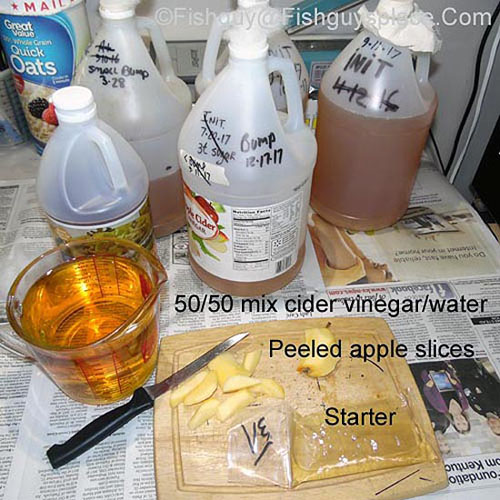
Date the jug and put it in a cool dark place at room temp and that's it. Agitate it once a week or so with a $store baster and you'll be ready to feed from it in 4-6 weeks. I advise starting a second jug about three weeks in using a few ounces from your first jug as a starter.
A month or so later.........To see if your culture is ready to use, pull some up in a baster and check with a magnifier or just viewing with a light source behind the baster. When you see lots of vineger eels it is ready. I harvest with a coffee filter put in a funnel made from the cut off top of a two liter soda bottle. You can also get a funnel at the $store. Put a few ounces of your culture into the filter and let it drain completely. The funnel sits in a clean catch jar.
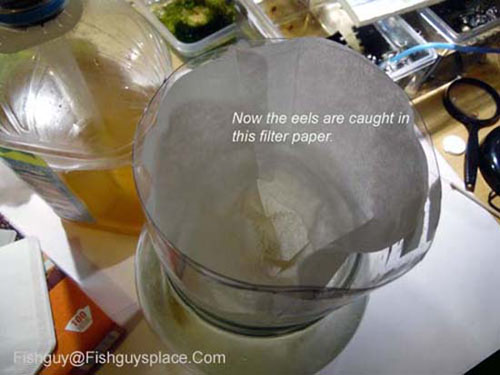
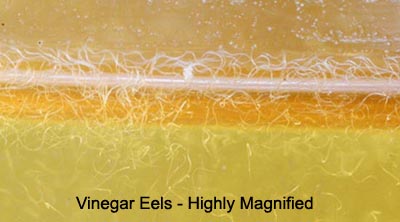
Here the vinegar has drained into the catch-jar and the vinegar eels are in the filter paper.
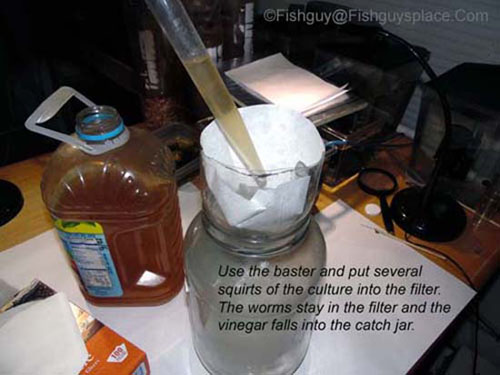
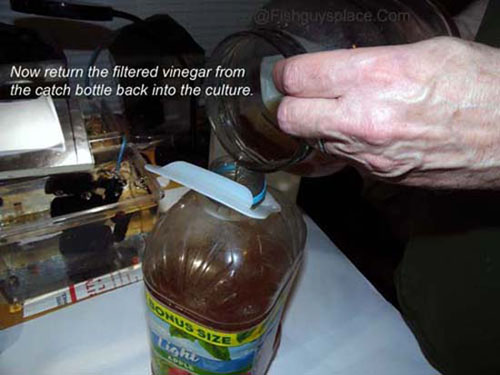
Return the filtered vinegar to the culture jar. If the culture is older and is starting to lose its sharp vinegar smell, then just discard this filtered vinegar and add fresh vinegar water mix to the culture.
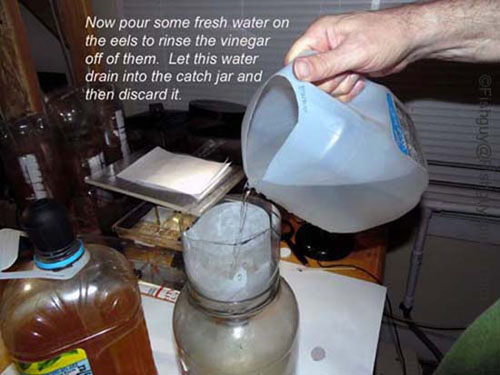
Use fresh water to rinse the vinegar off of the vinegar eels in the filter paper. Toss the rinse water afterwards.
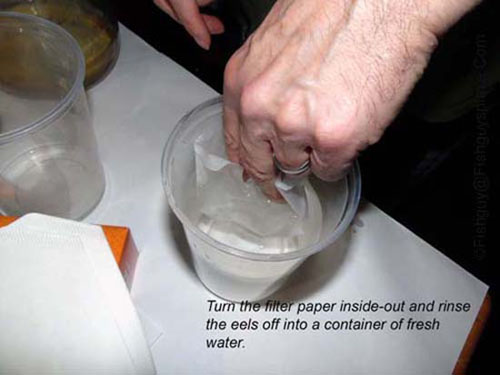
Collect the vinegar eels by turning the filter paper inside out and swishing it thoroughly in a container of fresh dechlor or tank water.
Vinegar eels harvested and ready to feed to fry.
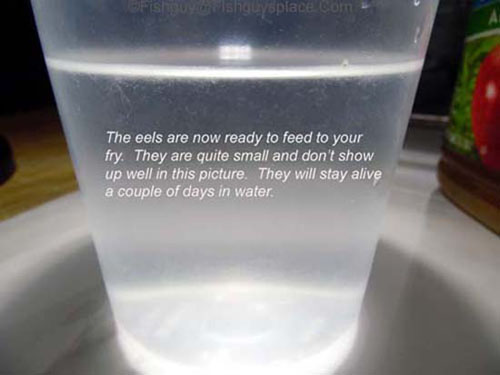
Feed the fry! A very small live food that swims and triggers the strike response of very tiny fry, and stays alive and doesn't foul the tank.
Micro Worm - Banana Worm - Walter Worm Culture FAQ
Abbreviations: MW = Micro Worm, BW = Banana Worm, WW = Walter Worm
Nematodes are difficult to identify even for experts. The differences between these three are best seen at the level of whole cultures and with experience. MW are the largest, reproduce slowest and don't stay alive quite as long as the others in water. BW and WW are smaller, reproduce faster, and last a bit longer in water. Some say the WW stays up in the water column longer, but I have not verified that. For smallest fry I use WW. For larger fry and small fish I use MW. The worm 'in the middle' in most respects is the BW.
They do not eat the medium! Free living nematodes like these are bacterivores, meaning that they eat very small organisms like bacteria and yeast cells. So why the oatmeal? The oatmeal, or any other carbohydrate that you use, is broken down by living yeast cells and bacteria that in turn are eaten by the worms. It is a miniature ecosystem wherein yeast 'eats' the carbs in the oats, then the worms eat the yeast.
oats > are digested by > yeast/bacteria > that are eaten by > worms
Container Prep For Grindal Worms
As of Spring 2025 no grindal cultures are available - Will post when they are.
Here I am using a 12" x 8" size shallow, plastic, food storage container. These are readily available at most $stores. Surface area is more important than depth, and 1" is a good depth for these worms.
Cut a vent into the lid and cover it with a piece of thin muslin cloth taped in place around the edges. Air passes through this and pests are blocked. A yard of this is just a few bucks at Walmart or a fabric store and lasts forever.
You can use any size container you wish. Some use a smaller container at first then expand to larger containers as the culture grows. Use the same construction for any size container.
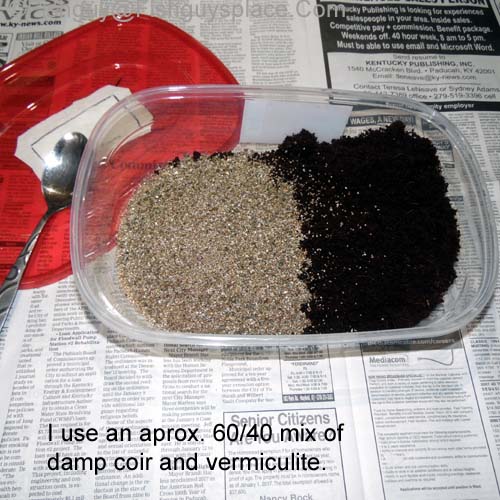
Next add the medium. Here I am using a mixture of coconut fiber called coir and vermiculite. The coir is inexpensive and readily available on Amazon in compressed bricks. I hydrate mine in a 5 gallon bucket per directions on the brick, then cover it and store in the same bucket. Using boiling water to hydrate also sterilizes it.
The vermiculite buffers moisture and moderates the compacting of the medium as the culture ages. Proportions aren't critical, but 60/40 coir/vermiculite is a good mix. Mix the medium thoroughly with a clean spoon.
You can also use potting soil that does not have any fertilizer or other additives. CAUTION if using potting soil you must sterilize it thoroughly to avoid introducing mites. Dampen it, then sterilize by either microwaving for several minutes until it is quite steaming hot, or by baking it in a conventional oven at about 300F for a half hour, again until it is steaming hot. Mix it intermittently during this process to make sure it is cooked through to kill any mites or eggs. You can also boil it then cool and dry it.
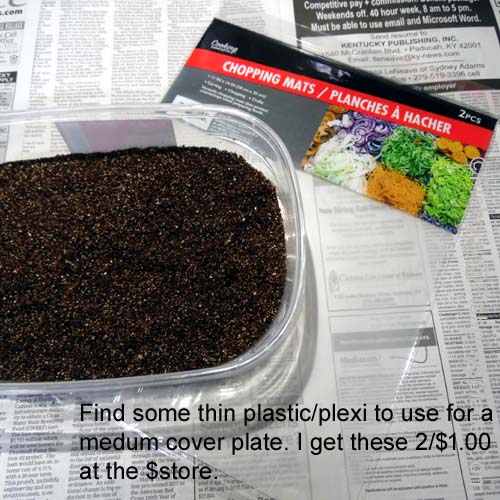
A cover plate is needed for the medium. Any lightweight, preferably transparent plastic will do. In the past I've used clear mylar sheeting from the craft store, but recently I've come across these translucent plastic mats that are two for $1.00, at the $store of course!
Trace the outline of the bottom of your container, then cut it out
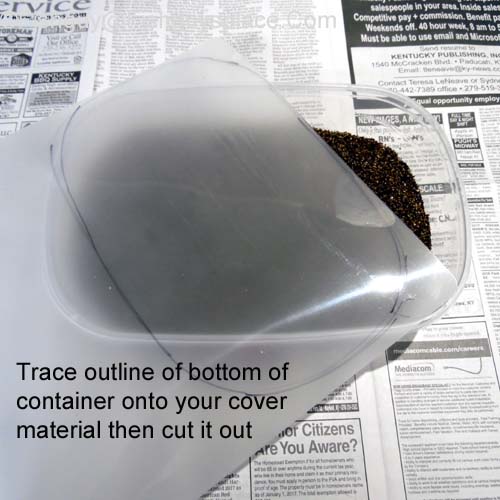
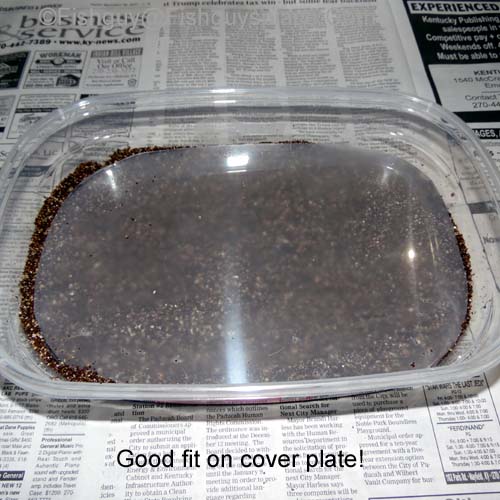
Ideally it will just about fully cover the medium in your culture container. Verify that it fits well, then set it aside while you finish preparing the medium for the introduction of worms.
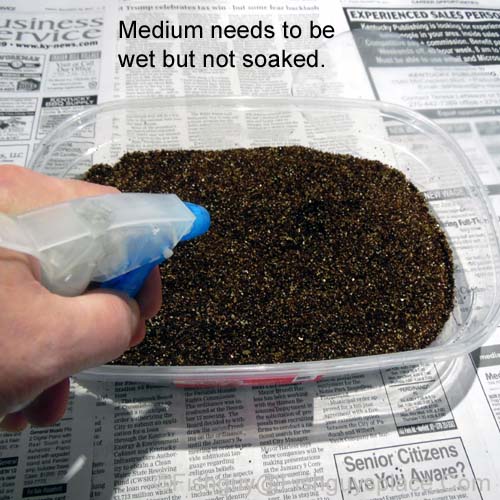
Judging the proper moisture level is a learned skill. Moisture builds up as a culture ages, so it needs to be moist but not too wet to begin with. A spray bottle of water ($store again) is a good tool for adding water. Give it a few spritzes, then using the spoon work the water in evenly, breaking up clumps.
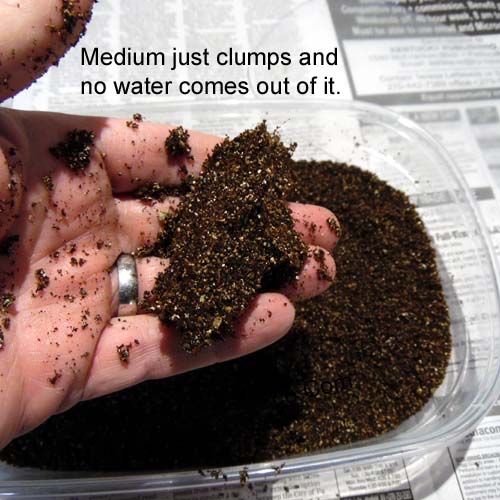
When the medium just holds together when squeezed, and no water comes out you are at a good point. Remember it is much easier to add moisture than it is to remove it, so take your time.
Container and medium are now ready! Time to add grindal worms and start your culture.
How To Culture Infusoria / Paramecium
Infusoria refers to the many microscopic and near microscopic life forms found in fresh water habitats. When the smallest fry hatch in nature, infusoria is their first food. It is small enough for them to swallow, and it moves, triggering their strike reflex. Raising very small fry in the artificial environment of the fish room is challenging. Your chances of success increase dramatically if you provide the live micro foods needed to get the fry through those critical first days.
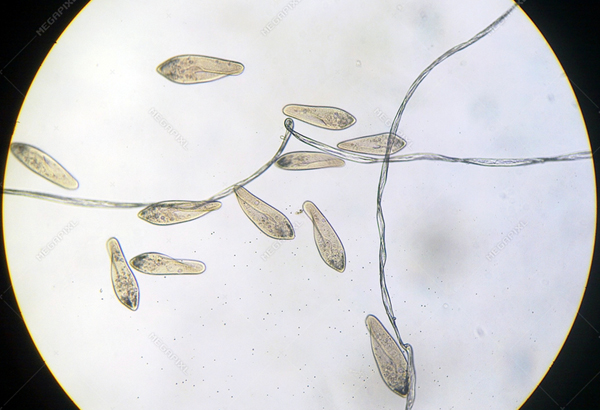
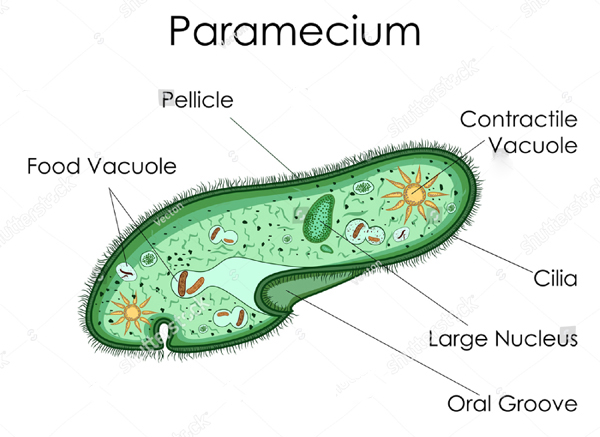
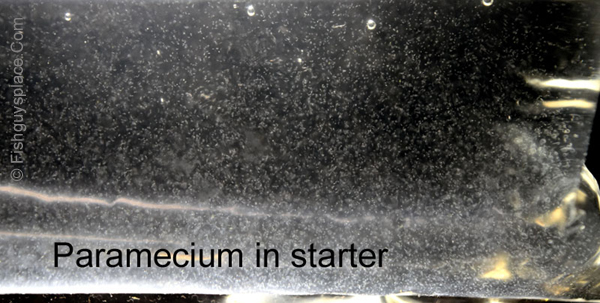
Paramecium are the primary organism in the infusoria cultures used in the hobby. They are single celled, slipper shaped, and move effortlessly using a fringe of tiny hairs called cilia as synchronized oars. The cilia also direct food into their oral groove which functions as a mouth. They are bacterivores eating bacteria, yeasts, and single celled algae. They are just visible to the unaided eye as white specks, and at an average 225 microns the species I work with are about half the length of a newly hatched brine shrimp nauplii. Their diameter though is just a fraction of that of the brine shimp nauplii. Reproduction is primarily by fission (dividing in two) and occurs two to three times a day depending on temperature, with warmer temps speeding up division. Life span is measured in divisions, and is usually between 200 and 300 divisions.
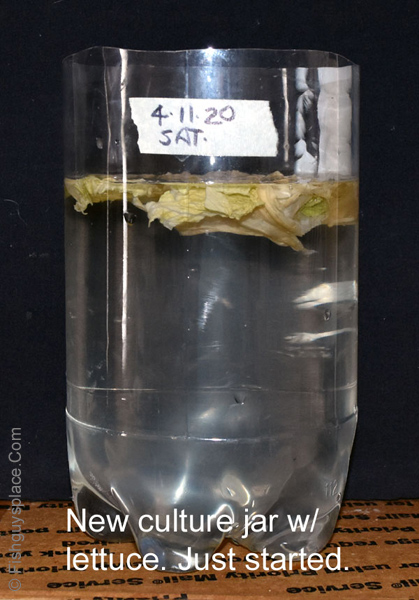
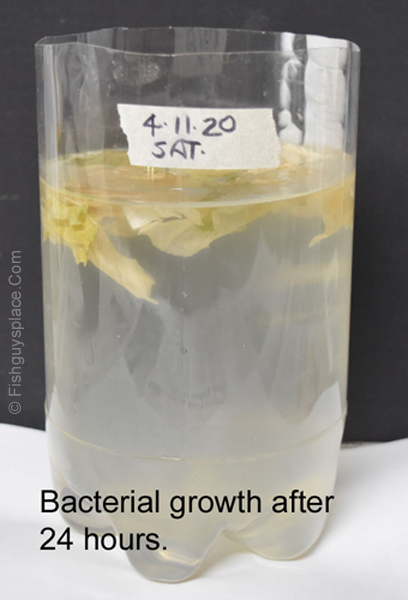
The first step in culturing paramecium is selecting a container, and getting a bacterial bloom going to feed the paramecium. They are bacterivores, consuming bacteria, yeast, and some species of cyanobacteria. I am using a cut-off, clear, two-liter Pepsi bottle for this tutorial. It is well rinsed out and filled with dechlorinated tap water at room temperature. If you are comfortable, the temperature is fine for paramecium. Several pieces of lettuce are added, and I put in four or five drops of milk to kickstart bacterial growth.
The paramecium do not eat the lettuce. It is broken down by bacteria of decay, and it is these bacteria that the paramecium feed on. You could use some rice or wheat grains, or another leafy vegetable. I like lettuce because I can dehydrate a whole head of it and store it in a baggie for use as needed. Once the culture is set up I label it with the start date and put it on a shelf in the fish room.
In 24 to 48 hours you should see the culture starting to cloud up. That is the bacteria breaking down the lettuce, and means it is ready for paramecium to be added.
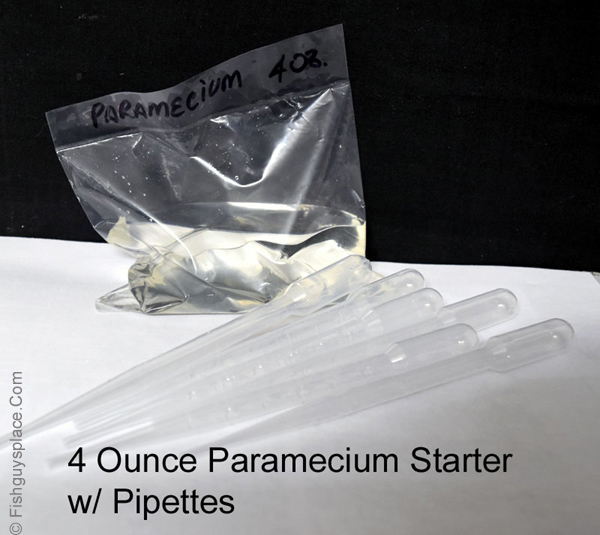
If you are using one of my four ounce paramecium starters you should order it when you start the culture container, so it arrives just about when the container is ready for seeding. This starter contains paramecium from my long running mother cultures. There are enough to get your culture going in four or five days.
Paramecium and other infusoria are usually present in our tanks. If you want to try culturing without a starter, you can hunt wild protists in the bottom mulm and among javamoss and other plants, in filter sponges and filter floss, and in your substrate. Collecting samples from all of these places and using them to seed the culture will sometimes produce a good mixed infusoria culture. If you go this route, just be sure to avoid introducing planaria and other unwanted guests.
While they are large enough to be seen with the unaided eye if your vision is good, I suggest getting a magnifying glass for a clearer look. A good magnifier is a very useful tool in the fish room, and a worthwhile investment. I also include pipettes to help with harvesting and and transferring paramecium.
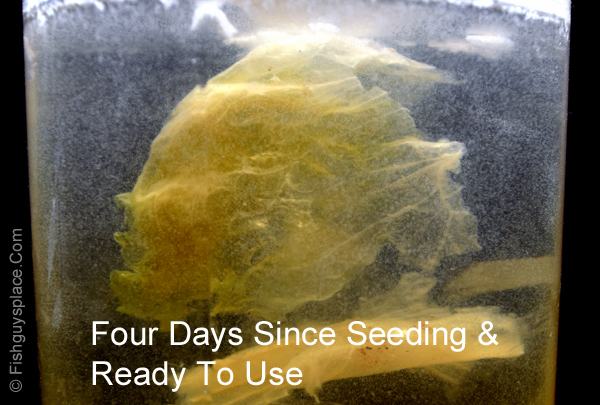
Here at four days since seeding, the culture is doing well and populated enough to harvest from. These cultures have a cycle that starts with a big bacterial bloom, followed by a surge in the paramecium population, and a corresponding decrease in bacteria. I harvest with a pipette or baster, and pull from where the paramecium are thickest, usually around the dacaying lettuce. When the paramecium population goes down, adding more lettuce or whatever you are using to promote bacterial growth bumps up the paramecium population.
If I'm feeding a small container like a petri dish, then drops are in order. Larger fry containers or small tanks can take more. Unless you are raising fry by the natural method, it is good practice to start them in smaller water volumes. Fry should literally swim in their food.
The culture water has an ammonia level, so don't overdo it. There should be a lot more fry container water than added culture. A little goes a long way too, since this is a food that stays alive until eaten! If filtration is used in the fry container, turn it off or down for awhile when feeding this, since it can be taken up in the filter. Using paramecium the first few days with really small fry significantly improves survival.
These cultures do produce an odor as the bacteria count peaks. I always put a loose cover on the cultures to help contain it and keep pests out. A round plastic cover like the one that comes on oatmeal boxes works well. Culturing in unmodified two liter bottles, as shown above, is another way to minimize odor. Some have a filter floss plug, while others just have the cap sitting loosely in place, allowing the culture to breathe. To feed from the narrow neck bottles just pour a bit of culture out into a small, open top container.
To keep a culture producing, when the medium clears simply add a bit more lettuce or whatever you are using instead. This should generate a fresh bacterial burst, and a corresponding increase in paramecium. After two or three weeks, you can start a second bottle to have one going when the first gives out. Using smaller amounts of lettuce in backup cultures creates smaller paramecium populations that are more sustainable for a longer time. When needed to feed fry, you can add more and start fresh cultures.
Feel free to experiment with different 'foods' for these cultures. I am currently working with yeast as a possible alternative to bacteria of decay. There are also a number of alternative techniques to explore on YouTube. As with most aspects of the hobby, there are many ways to achieve a good outcome! I usually have these starters in stock and they can be ordered by email or contact form from this website, or from the live foods section on AquaBid, where I sell as fishguy_1955. Pricing is here below.
Paramecium Starter Culture Pricing - Shipping Cost Combined On Multiple Purchase
Pips = Pipettes
| Size | Pips | Price | Ship | Item Code |
|---|---|---|---|---|
| Four oz. | 6 | $6.75 | $4.75 | P4 |
| Six oz. | 6 | $8.75 | $5.00 | P6 |
Back To Live Food Contents
Culturing Vinegar Eels Like Microworms
The Hyperdense Vinegar Eel Culture
04/09/24 New media prep method presented
Harvesting the vinegar eels from this liquid culture requires several steps to separate them from the vinegar before you can feed them to your fry. Wouldn't it be great if they remained simple to culture, and were as easy to harvest and use as micro worms?
It turns out there is an easy way to culture vinegar eels (VE) just like micro worms, on semi solid medium like oatmeal or mashed potatoes, and harvest them with a simple finger swipe or a Q-tip! About two weeks into the first experiment with this technique, I thought it wasn't going to work, then in weeks three to four the first cultures took off. Knowing that it could be done, the next step was to find a way to do it simply, and a lot faster than three to four weeks. Those first solid media cultures were the key. I can now use a six ounce hyperdense starter to start a vinegar eel culture that is ready to feed from in a day or less after setup. These cultures last longer than micro worm cultures, up to a couple of months or longer, and are very simple to keep going.
I want to thank my friend Mark Plessner for his help in running multiple trials to arrive at the optimal media. His assist cut a lot of time out of the process!
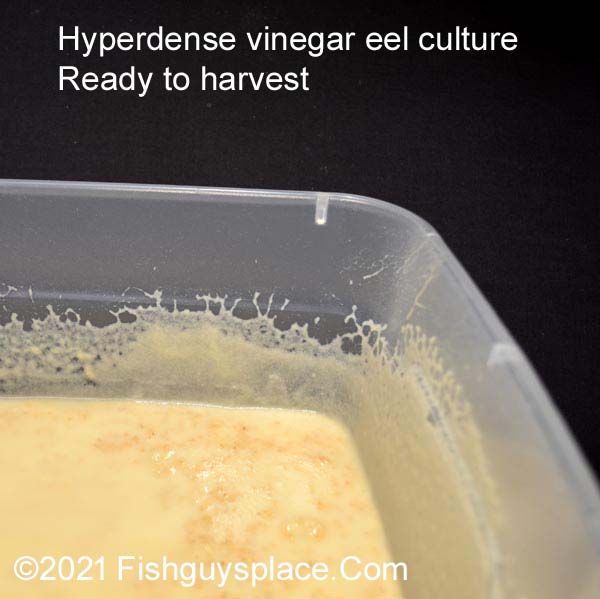
The key to this technique is starting out with, and maintaining a very large number of vinegar eels in a small space. High population density is what makes it happen. My six ounce, solid media starter contains many times more VE than a much larger liquid vinegar culture, where they are spread very thin.
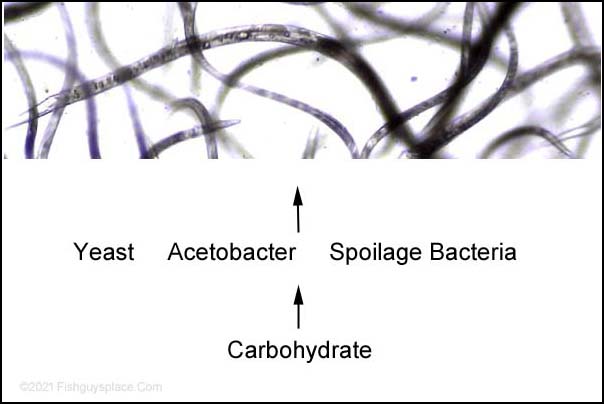
What about the vinegar? Do these cultures do away with the vinegar? No. Vinegar is still used and the worms help out by leaving it for harvesting. The vinegar preserves the media, extending the culture's life. It also promotes the growth of the specialized bacteria, Acetobacter aceti, that is the vinegar eel's primary food.
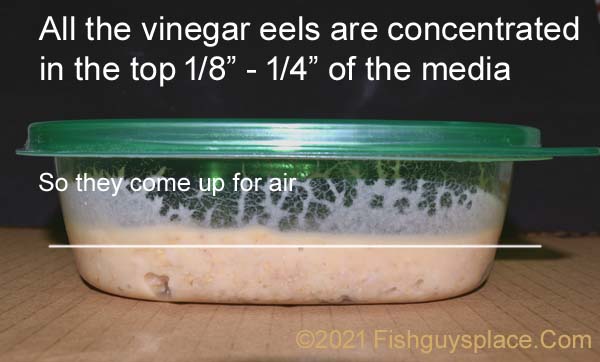
The culture is a miniature ecosystem with a carbohydrate, oats or potatoes, at the bottom and the vinegar eels at the top. Yeast breaks down the carbs in the media, converting it to alcohol. Immediately, the Acetobacter convert that alcohol to vinegar. All the while, spoilage bacteria are trying to work on the oats, but the acidity of the vinegar keeps them in check. The vinegar eels swim in this sea of food, eating the yeast, Acetobacter, and spoilage bacteria. They do not consume the media.
Within hours to a day, cultures started per instructions, using the six ounce starter in a sandwich size container will usually have worms crawling the container walls. Harvesting them is as simple as swiping the edge of a finger along the inside wall of the culture container, and swishing the worms thus collected into the fry tank or container. Some may choose to use the edge of a spoon or a Q-tip. Vinegar eels can be harvested and fed to fry in about a minute. As one who has used the traditional, liquid method for decades, I am still amazed by the speed and simplicity of this technique. Some may want a standard, liquid, vinegar eel culture as a backup.

Hyperdense Vinegar Eel Starter Pricing
| Size | Pips | Price | Ship | Item Code |
|---|---|---|---|---|
| 6 oz. | 6 | $8.95 | $4.95 | HDV6 |
Back To Live Food Contents
Hyperdense Vinegar Eel Culture Instructions
Using a Six Ounce Hyperdense Starter
Begin by preparing a container for your culture. To ensure the culture gets going in a day or two, you need to use a sandwich size container. Larger containers will take longer to get started. Vent the lid so the culture can breathe. Screen the vent to keep flies out. I tape a square of thin cloth over the vent, you could use paper towel if you keep it dry.
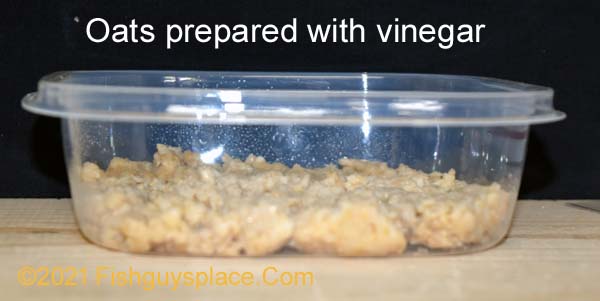
As of April, 2024 I'm updating instructions for media prep with what I've learned doing this over the last several years. Whichever medium you use, oats or instant mashed potatoes, you prepare it by simply soaking it in pure cider vinegar for a few days. I start by filling a quart size yogurt or deli container about 2/3 full with old fashioned or quick oats. Then I fill the container to the top with pure cider vinegar and give it a good stir to distribute the vinegar. Put a lid on it and place it on a shelf for a few days. Check in on it and add vinegar as needed to keep the oats covered as they absorb it.
Prepare the media by soaking in vinegar as described above and put some in your container to a depth of about 1/2". Too much depth can cause your worms to take longer to start wall crawling. If your oats aren't good and soaked, moisten them with a few spoons of vinegar.
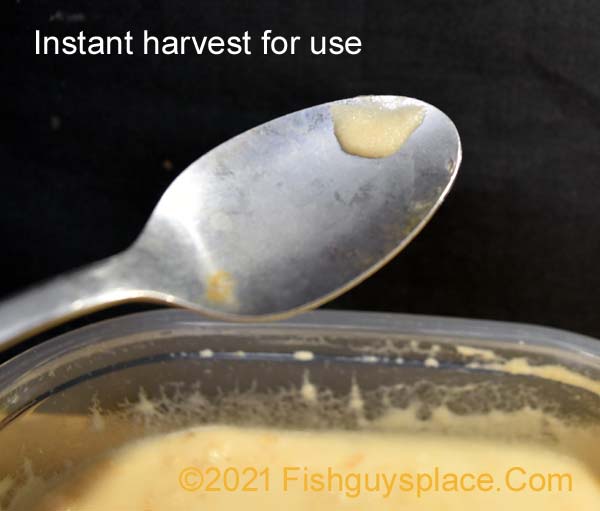
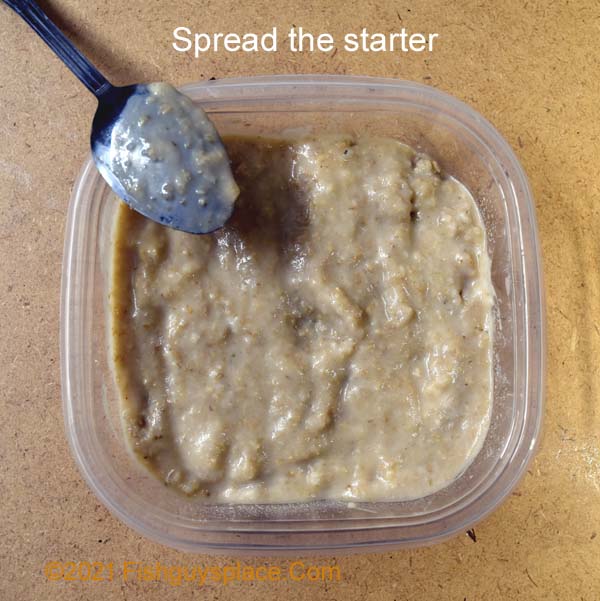
Your six ounce starter comes in a sealed bag. Snip one corner off the bag, and pipe the starter onto the surface of your media like cake frosting. This is not a good time to show your significant other what you are doing. Use a spoon to spread the media evenly over the surface of your culture.
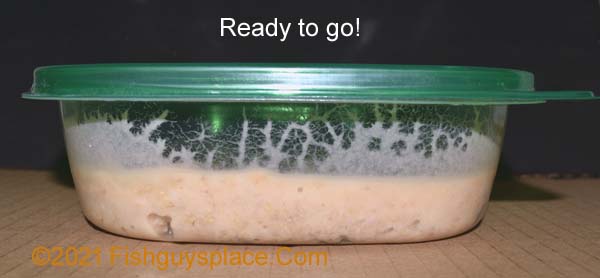
Starter placed on medium. Now put it away in a cool spot out of the sun and bright light. Check it in 12 - 24 hours and you should see worms beginning to crawl the walls!
Keeping your culture going - Pretty simple
Give your newly setup culture a week or so to get going strong. If it seems dry, sprinkle a couple spoons of cider vinegar over it. A couple times a week, stir the surface layer up a bit, but no deeper than 1/4". You don't want to turn the worms too far under. This keeps things aerobic and helps combat spoilage bacteria. The oats will liquefy somewhat over time, but this is no problem for the vinegar eels and is alright. If a cloudy, grayish looking layer develops on the culture's surface, do not panic. It is mother of vinegar which is a mixture of yeast and bacteria. Add a little vinegar and break it up well. As much as 1/8" of vinegar on the surface of the culture is fine too. Repeat as necessary. I've had worms be fine under a thick layer of this mother, and they reappear as it is broken up. A high worm population helps prevent this from forming.
When your culture just starts getting dark, and the smell is just a little more foul than vinegary, it's time to start another one. Start the backup well before your original culture starts looking and smelling really bad. Prepare another container like the first one, and spoon off the top 1/4" of your current culture, using it as a starter for the next. You could also do this when your first culture is going strong, to make sure you have a backup.
If you are outside the US or can't get one of my hyperdense starters
You can start from scratch using a standard liquid vinegar eel starter or culture. It takes about a month, and sometimes doesn't work first try, so patience is needed. Begin by preparing medium as instructed above. Get the medium into a container as above, but use more, filling the container about halway up with media.
Pour your liquid vinegar eel culture into the container until it is about 1/8" higher than the media, so the media is slightly submerged, then close it up, and put it up. After a few days it will develop a skin on top of the liquid. This is mother of vinegar, a combination of bacteria and yeast. Give it a good stir, breaking it up. You should do this at least once a day, twice is better, for the first month. After the culture takes off, the worm activity will keep the skin broken up. If the oats absorb all the excess liquid, top it off with cider vinegar to bring it up to just over the oats.
If you'd rather get going in a few days as opposed to weeks, the starter sold here will do that.
Back To Live Food ContentsHow To Culture Monoraphidium contortum
What is Monoraphidium contortum?
It is a new-to-the hobby species of freshwater microalgae. It appeared in one of my tanks in 2025 and took it over. It's growth rate, ability to stay suspended, and longevity got my attention. Instead of dumping it, I isolated it, identified it with the microscope, and began culturing it. I soon decided to quit culturing Chlorella and concentrate on Monoraphidium. It surpasses Chlorella in every way, and I did not want to chance Chlorella getting into the contortum. It's that good.
This article describes how I am culturing Monoraphidium contortum. It is not the only way, and probably not the best way, but it is a way that works well for me. I hope it will be helpful to those interested in culturing this species, and that it will encourage others to experiment with it and share their techniques and results.
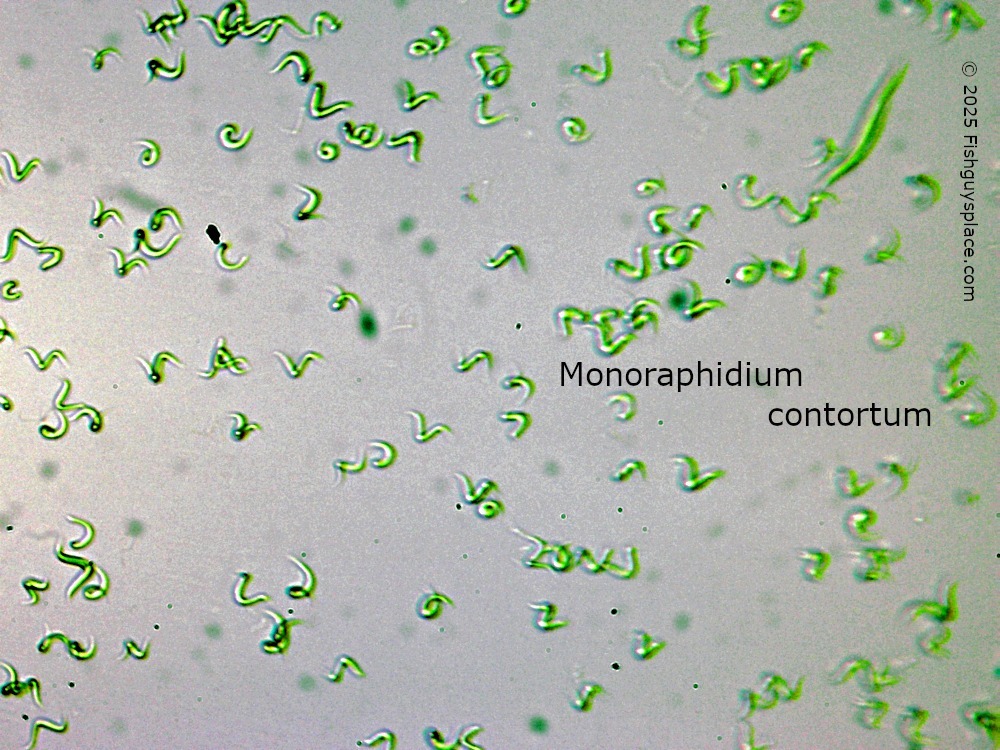
Characteristics of Monoraphidium contortum
- Fast growing
- Stays suspended - long hang time
- Does not clump easily
- Robust
- Small cell size
- High biomass
- Does very well with F2 fertilizer
- Very high in lipids/omega-3
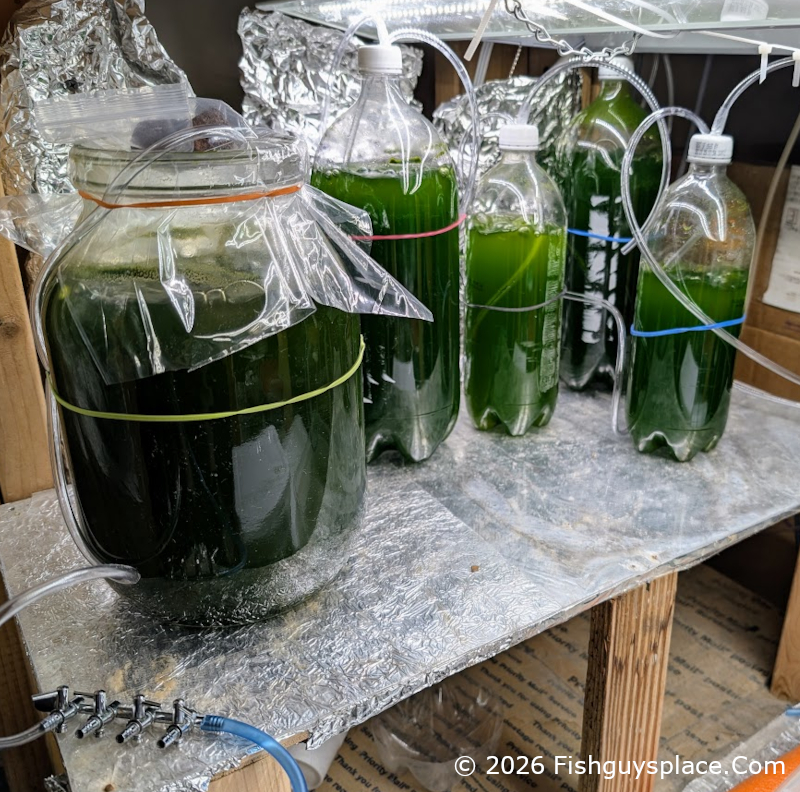
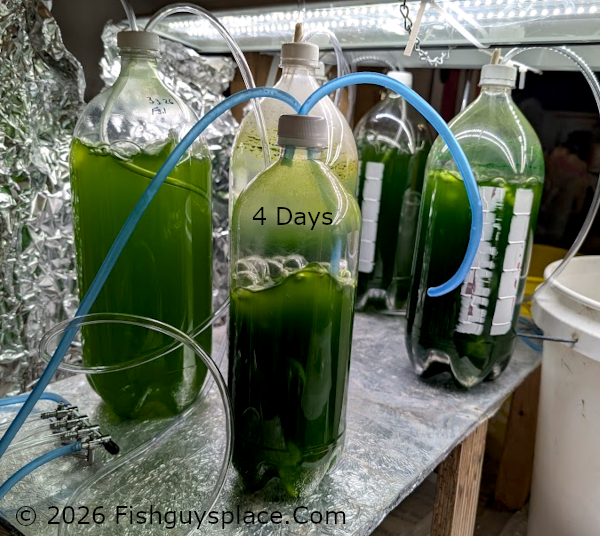
How well does the microalgae Monoraphidium contortum stay suspended? I took this two-liter culture from the light bay, disconnecting the air to it, 36 hours before the photo was taken. Even the dense, dark green biomass hasn't clumped or significantly settled yet!

Why Culture Monoraphidium contortum?
Freshwater aquarists use microalgae, also known as green water, or phyto, to feed daphnia, moina, and other zooplankton cultures. Unlke prepared foods like yeast and spirulina powder, live microalgae stays alive until eaten. It doesn't decay and foul the culture water, crashing the daphnia or moina.
Its cells are small enough to feed newly hatched moina that can be as small as rotifers. Here's a moina that's been feeding on contortum.
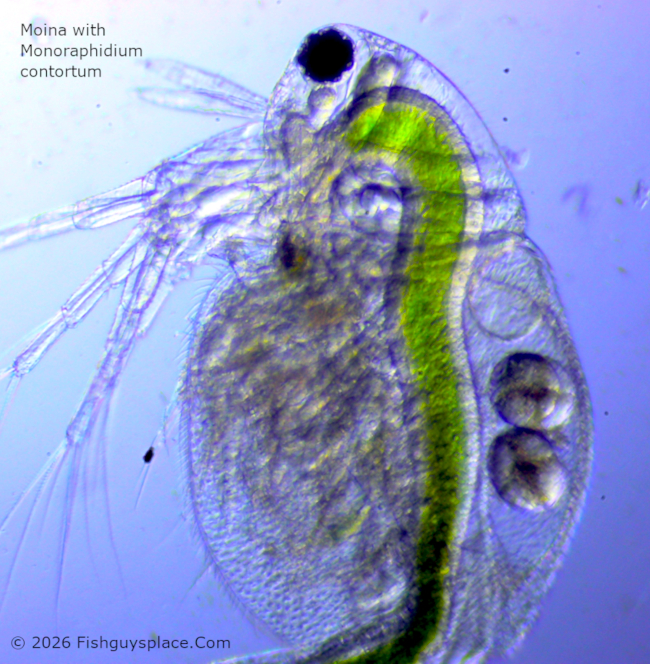
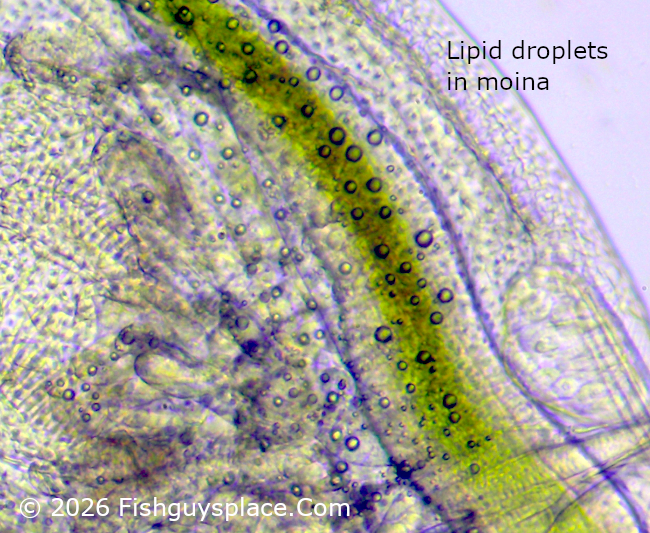
A closeup of the moina shows its stored lipid droplets. They are polyunsaturated fatty acids that come from the contortum cells it has eaten. These are the omega-3s that are so important for the health and development of fry. High lipid content is a key characteristic of Monoraphidium contortum.
What M. contortum or any microalgae culture is NOT.
We don't culture green water to feed it to fry. We culture it to feed the zooplankton cultures that will be fed to fry. A pure microalgae culture (green water) is NOT a first food for tiny fry. They will starve out if fed pure microalgae because the cells are too small for them to see and eat.
Microalgae is best cultured by itelf, in pure cultures without any zooplankton present. A common mistake is trying to culture green water and daphnia, for example, together in one container. It won't work. This is like trying to raise rabbits in a lettuce patch. You culture the green water, then harvest it and feed your daphnia or other zooplankton in their own container.
Materials
Here's what you should have to get started with phyto culture:
- Suitable Location
- Starter Culture
- F2 Fertilizer
- Light Source
- Culture Container
- Dechlorinated Water
- Air Supply, Tubing, Valve
Suitable Location
Pick a location for your cultures that maintains a comfortable room temperature. If you are comfortable, most phyto and zooplankton cultures should do well at that temperature. The location should have an electrical outlet for lights and air, and should be somewhere the light, potential spills, and bubbling sounds won't bother housemates.
Starter Culture
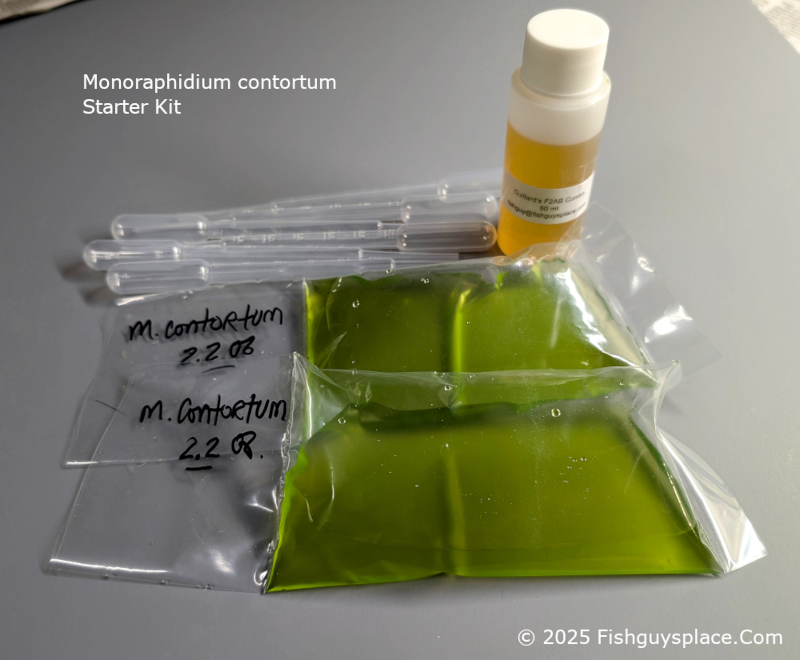
The techniques presented here also apply to culturing other microalgae species, and you can use a starter of another species, like Chlorella, if that is what you have. As of this writing, February 2026, I am the only source for live Monoraphidium contortum starter cultures that I and Google are aware of. The instructions here use one of my starter kits.
Fertilizer
Algae has different nutrient requirements than plants. I use Guillard's F2 liquid fertilizer for all my phyto cultures. I'm working on my own formulation, but that takes time, and F2 will be a challenge to improve upon! Feel free of course to study and experiment with your own fertilizer ideas. I strongly suggest starting with F2 and getting some experience and good cultures going before experimenting. You also need to be careful about toxicity to zoplankton like moina, dahnia, copepods who will be consuming the algae. I find F2 grown phyto to be non-toxic even to daphnia, and even at high doses.
The 50 ml that comes with the starter kit is enough for 25 gallons of culture. You can Google F2 fertilizer to see online suppliers. I may offer it here as a separate item in the the future. F2 is a two part fertilizer, though it often comes pre-mixed. Some suppliers sell it in parts A and B bottles. If you get this, you just mix equal parts of A and B together to get F2 ready for use. My 50 ml portion is pre-mixed.
Light Source
Light and fertilizer are the two most important factors in phyto culture. Monoraphidium contortum does very well with a lot of light. I use high output LED shoplights for my main light bay, and smaller LED strips for smaller spaces. Mount the lights close to the cultures. LED lighting lets you get the lights close without worrying about heat. I get exceptional results with these inexpensive shop lights. You can of course experiment with your own light source ideas as you learn more about phyto culture.
Culture Container(s)
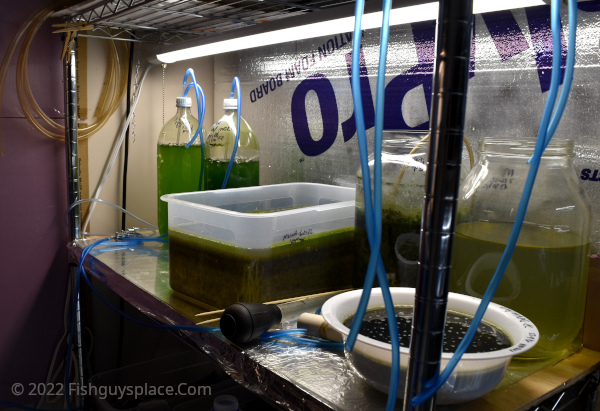
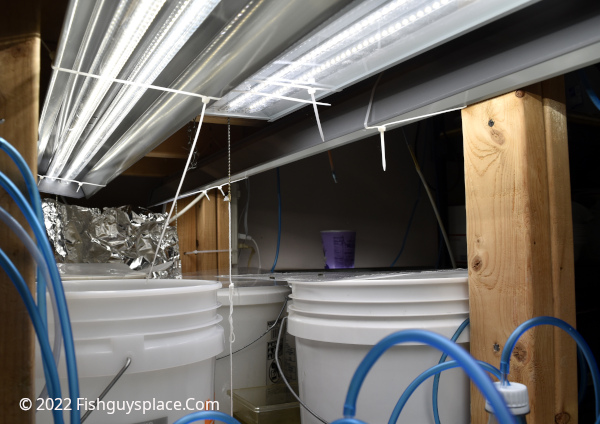
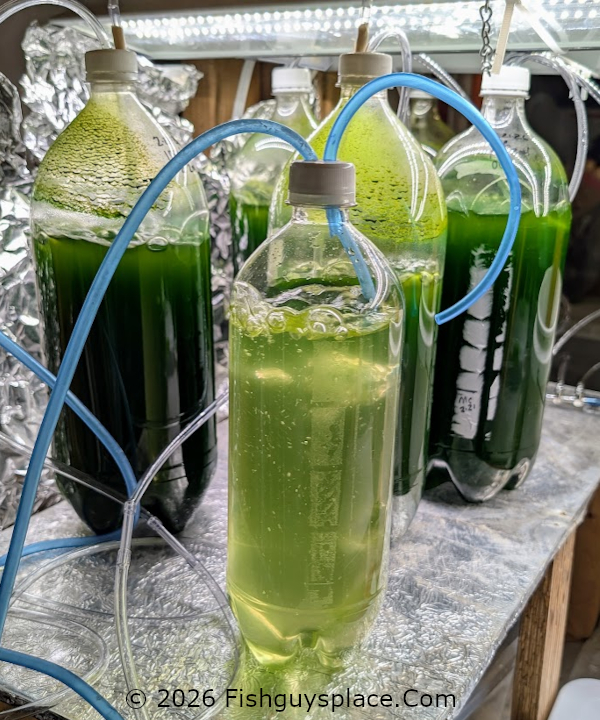
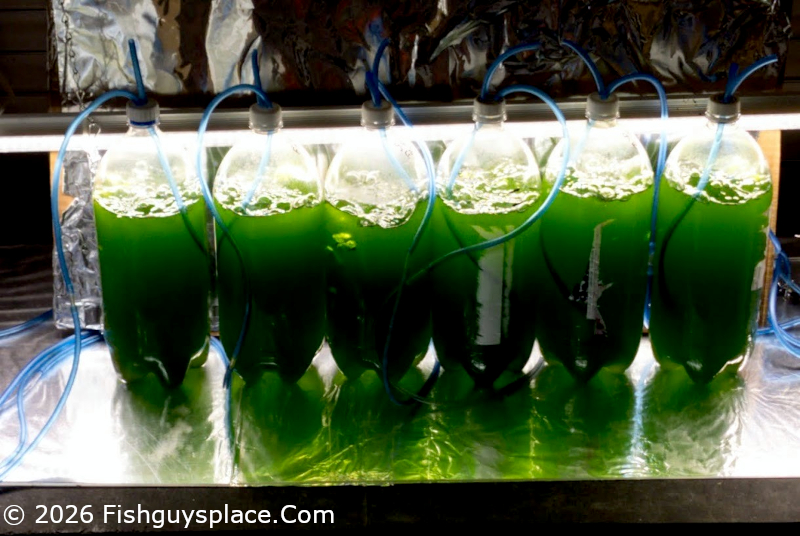
I use two-liter soda pop bottles for my mother/backup cultures. The way I construct them makes them less susceptible to contamination. Next up in size are glass, one-gallon jugs. I buy these up locally at garage sales or on FB marketplace. Higher volume, production cultures can go in aquariums for maximum area exposed to light, or five gallon buckets if you have a strong overhead light source. All containers used should be thoroughly washed and rinsed before use.
Here are a gallon jug, one-liter, and two-liter cultures in my big light bay. They're on a rasied platform I built to get them up closer to the lights.
Dechlorinated Water
I use tap water dechlorinated with my DIY sodium thiosulfate solution. Any dechlorinator works. My water has a pH of 7.2 and a TDS that ranges from 90 to 190 ppm depending on the season. I've checked references and it looks like contortum favors slightly alkaline conditions with pH of 7 - 9 likely working well.
Air Supply
I run the cultures off the central header in my fish room. Cultures can also be aerated using smaller, individual pumps. Standard aquarium silicon tubing and air valves are also needed. I never use small-bubble aeration from airstones. Large bubbles from the open end of an air line, or in my case rigid tubing work well. In larger, production cultures, I rubber-band a small piece of PVC, rock, or other inert, non-metalic material to the air line to keep it submerged. I never use metal of any kind in cultures or aquariums.
Getting Started
Container Prep
You don't have to duplicate these if you have a different container or method in mind. The main idea is to have a somewhat enclosed container that will keep stuff from drifitng in. You container should be clean and have a hole for the air to come in, and another for the air to exit.
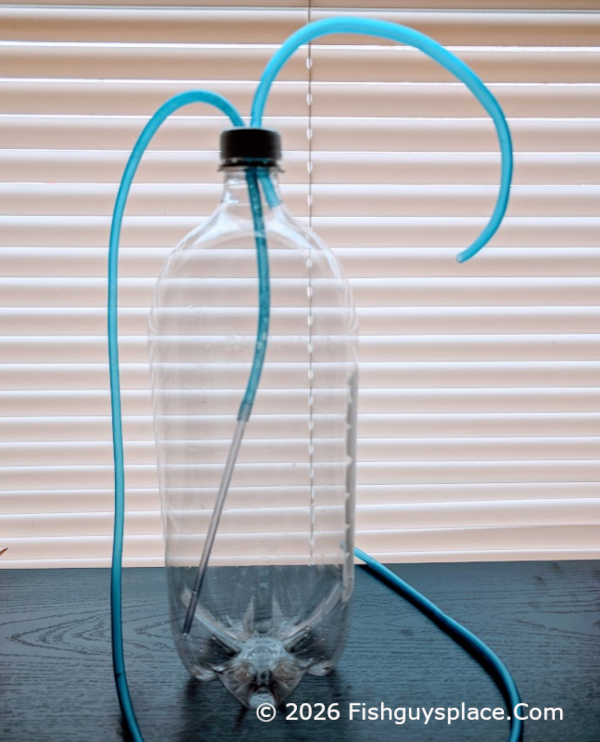
To prepare my one and two-liter mothers, I drill two holes in the bottle's cap. In one hole I insert an air line with maybe six inches of rigid tubing on the end to weigh it down. I push this air line all the way to the bottom of the container. This line is the air inlet and releases large bubbles at the bottom of the culture. The other hole is a vent to let the air out of the bottle. I put a short piece of air line just barely into it to prevent splashes from coming out. A little plug of filter floss also works.
If you don't want to to drill the top, you can do as I do with the one gallon jugs and rubber-band a piece of clear plastic bag over the top. A small cut in the plastic for your air-line serves to let air in and out.
Medium Preparation
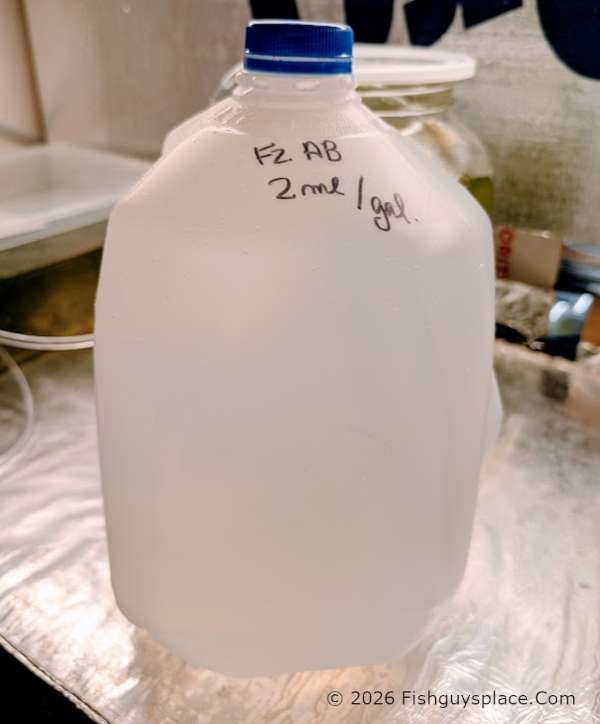
Measuring Tip: 1 ml of liquid = 20 drops
I have been dosing my cultures with 2 ml of F2 per gallon of water. Instead of trying to calculate how much should go into different size containers to get that dosage, I put 2 ml and a gallon of dechlorinated water into each of several well cleaned one-gallon milk jugs. I close those up and store them out of direct light. When I need to start a culture in a bottle, jug, or jar, I simply open a jug of my prepared F2 water and fill it. When algae is harvested from a container, I only have to pour from a prepared jug of fertilized water to top it off. Simple is good.
Launch Cultures
The kit I'm using for this example comes with two, 2 oz Monoraphidium contortum starters. I suggest starting one in a one-liter bottle, and the other in a one or two-liter as you choose. The one-liter should mature fast, giving you a lot of starter to use expanding into larger cultures if that is what you want to do. I always run multiple backups just in case.
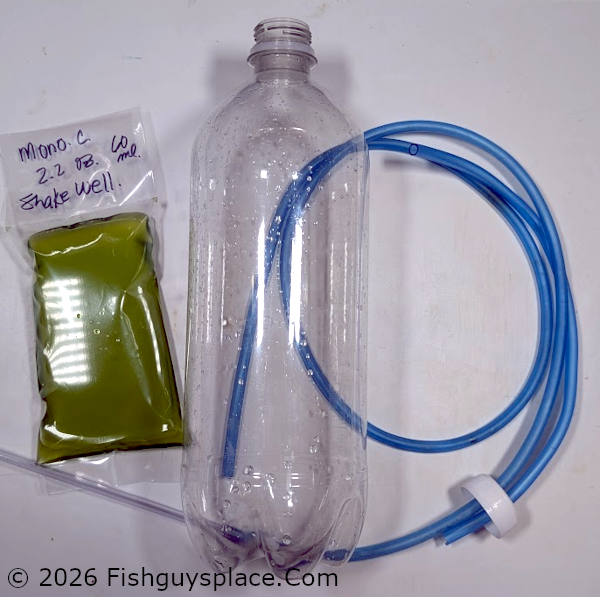
Shake the starter to make sure any settled algae comes back up, then snip a corner off the bag and pour it into the culture bottle. Fill the bottle with your F2 solution, leaving three to four inches of head space at the top. Drop in the air line and screw the cap on. The culture is good to go.
Put the culture under your lights, and connect the air line. Set the air for moderate flow to keep things turning over and suspended, and turn the lights on! I turn the lights off at bedtime and on in the morning. It works out to about 16 on and 8 off.
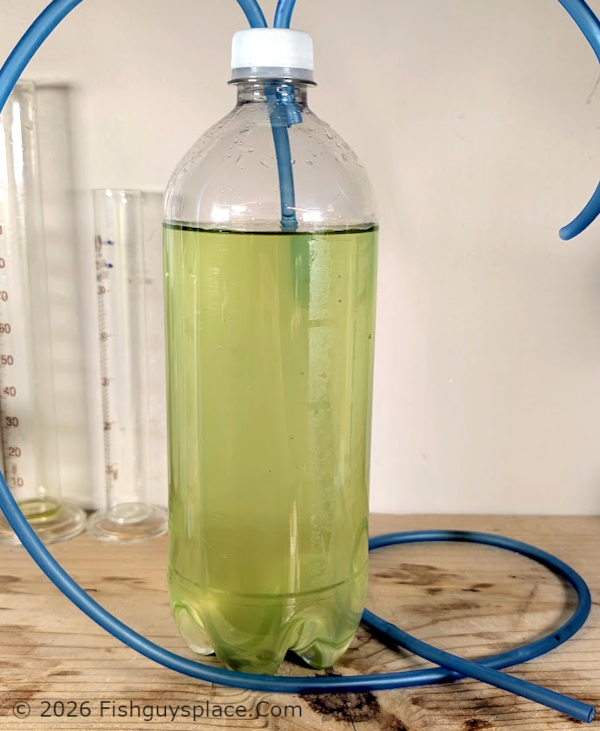
Here is the same one-liter culture 48 hours after it was started in the step above. It is already taking off. When there is sufficient fertilizer used, and good aeration, growth in this phase is largely determined by light exposure.
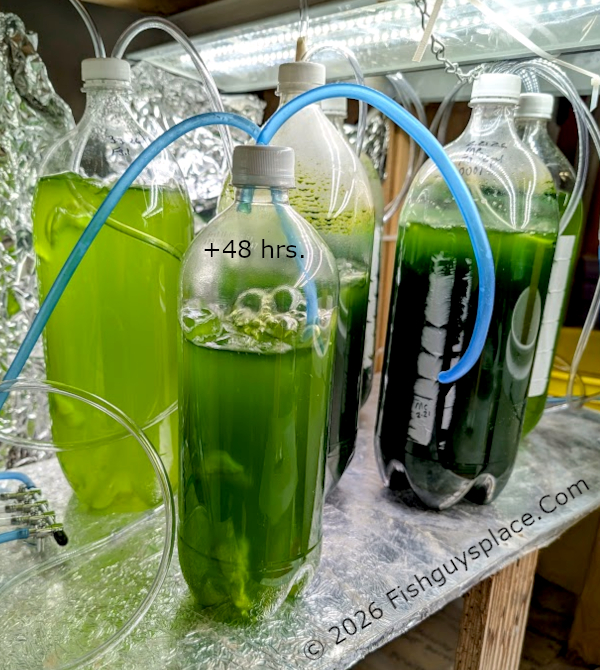
Finally, at four days after launch, it has peaked with a dark green, dense biomass.
When the culture reaches a maximum green, or optimally just before, it is ready to harvest. I pour off about 2/3 to 3/4 of the culture for use, then refill the bottle with fertilized F2 water and restart the air. This can be repeated several times before you will need to clean the bottle or container and start fresh. Cultures will get darker until they reach peak biomass for your setup. If they stay at max green too long, nutrients get used up, dead cells accumulate, and the culture crashes. With practice you'll get a feel for harvesting at an optimal point. If you harvest sooner, when the culture is green but not super dark green, and refill with fertilized water, you can usually get more repetitions out of the same culture before having to reset.
Important: Be careful to not contaminate your backups with any any other organisms from tanks or any other source, like splashes, wet hands, etc. You want to keep these cultures 100% Chlorella vulgaris.
Production Cultures
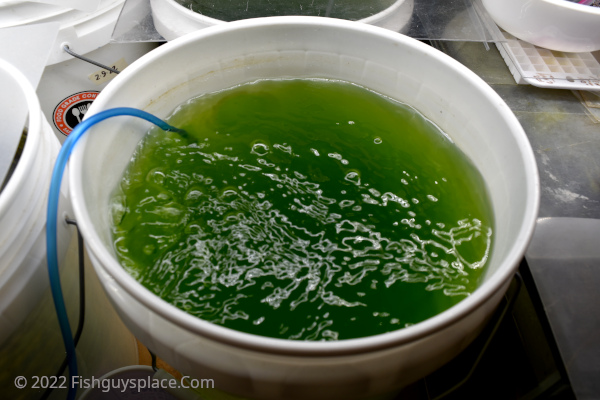
There are two potential differences between backup/mother cultures and production cultures: size and how careful I am about contamination. Some really large cultures, like those in five-gallon buckets or aquariums, are hard to keep 100% pure, so I don't take as many procautions when working with them. They are for generating food for other cultures, and if they go south, are just dumped and restarted from a pure backup. Contortum's reproduction rate is so fast it will likely outgrow most competitors that drop in.
The five-gallon buckets require a very strong overhead light and strong aeration to expose all the algae to enough light. It's a good idea to cover the buckets with glass or plexi if it's available. A spare all-glass aquarium is a really good option for a large culture contaner.
It's also possible to produce a good quantity of contortum in a number of smaller containers. These are inherently easier to keep pure, and if one goes south, you have others to fall back on. I have used a number of two-liter bottles with a dedicated light fixture for feed production. This also works with one-gallon jugs. An advantage of smaller containers is not losing as much in a crash.
That's about it in terms of getting started. Don't be afraid to experiment, and keep your backups going. If you have any questions along the way, you can always drop me a note at: question@fishguysplace.com
Monoraphidium contortum Starter Kit - Shipping Cost Combined On Multiple Purchase
| Item | Price | Ship | Item Code |
|---|---|---|---|
| M. contortum Kit | $12.75 | $5.00 | CSK |
Back To Live Food Contents
Mythbusting - Vinegar Eel Culture
There are a number of long-standing myths in the hobby. I've been exploring some of the myths around culturing vinegar eels, the nematode worm Turbatrix aceti. Some of these myths persist simply because of culturing instructions that we never think of questioning.
Don't be afraid to experiment! Use what is proven to work as a basis, and from there look at ways to improve outcomes or do something in a simpler way. Here are some truisms about culturing vinegar eels that aren't really true.
1. Vinegar eels (VE) must be cultured in a 50/50 mix of vinegar and water.
False - Vinegar eels MAY be cultured in a 50/50 mix of water and vinegar, but this dilution is not necessary. I culture vinegar eels in straight vinegar without diluting it. This extends the already long life of a vinegar eel culture. Vinegar is a preservative. It resists the growth of bacteria of decay that eventually take down the culture. My cultures in pure vinegar last longer than cultures in vinegar and water.

2. Unpasteurized vinegar must be used for VE cultures.
False - You can use it, but unpasteurized vinegar is considerably more expensive than economy store brands and is not necessary. Inexpensive, pasteurized, store brand vinegar works perfectly well for VE cultures. Pasteurized vinegar has been heated to kill bacteria. The specialized bacteria and yeast cells that the VE feed on are always present with the VE in the starter and begin reproducing immediately in your new culture. Some sources say there are live vinegar eels in unpasteurized/unfiltered vinegar. This is not true. There are no vinegar eels in the grocery store.

3. Apple cider vinegar must be used to culture VE.
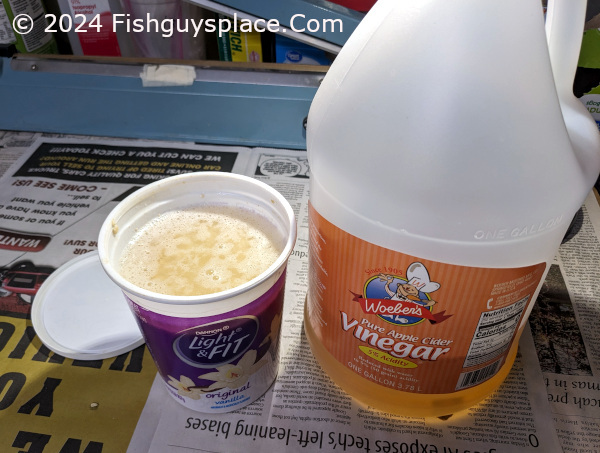
False - White (clear) vinegar works just as well, is less expensive, and is always available. This comes as a surprise to many, but as long as the vinegar has an acetic acid concentration of 5% it works to culture VE. Just be sure the label on the bottle reads 5% acetic acid and you are good to go. Pictured below is a VE culture in white vinegar with an apple slice.
WARNING: Do not use specialized cleaning-strength vinegar for culturing. It is too strong. Use only 5% vinegar suitable for human consumption.


4. Apple is necessary for vinegar eel culture.
False - Carbohydrates (sugars) are necessary for VE culture. Apple slices are just one carb source that works. The apple slices work very well because they release sugars over time as they break down. Other carb sources can be used, including table sugar. Table sugar is all immediately available and may need bumping up as the culture ages. The clear vinegar culture pictured below is going strong with table sugar as the carb source. I'm going to start a culture with potato slices, which should work. As we see in item (5) even oats work as a carb source.

5. Vinegar eels must be cultured in liquid media.
False - My hyperdense, solid media VE cultures are just like micro worm cultures. I use oats saturated with vinegar, but they can also be cultured on mashed potatoes, or any other carbohydrate micro worms are cultured on. These cultures make harvesting VE as simple as a finger-swipe and swish in the fry tank.

6. You can start a vinegar eel culture without using a live vinegar eel starter.
False - Vinegar eels only come from other vinegar eels. Nothing in the grocery store has live vinegar eels in it. To start a vinegar eel culture, you need live vinegar eels from an established culture.
That's all for now. Best of luck with your cultures, and of course with your fish! If you have any questions, I can be reached by email at: question@fishguysplace.com
Paul P.
Back To Live Food ContentsCopyright 2026 Fishguy's Place - All Rights Reserved