
Page Updated 03/01/26
Articles & Papers & Links
This area is for articles, papers and links of interest to the aquarist. Material from a variety of sources is featured and always welcome. If you see something that could benefit other fish keepers, or have written a piece yourself, please submit for consideration and possible sharing here. Attribution is of course always given.
Build Your Own Low Cost, High Efficiency Internal Filters
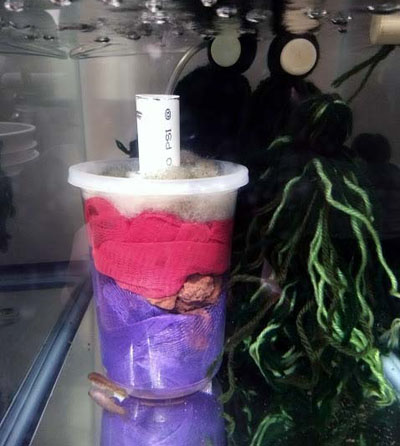
The internal filters described here are simple to construct using readily available, low cost components. They are easily customized to fit any size tank or container, from a plastic shoe box of fry to a planted 20 gallon natural setup. Unlike sponge filters they do not clog up and stop, or float away when a suction cup stops working. By applying the basic principles of bio-filtration, they can be made to go to work immediately, without waiting weeks for the filter to cycle.
These filters perform both mechanical and biological filtration. Mechanical filtration removes suspended particles by passing water through a porous material that traps the suspended matter. This produces clear water, which may or may not be healthy for fish. In biological filtration, water passes through living colonies of specialized nitrifying bacteria that convert highly toxic ammonia waste to less toxic forms. A filter is considered cycled when enough of these bacteria are present to process the ammonia present in a given tank, keeping it at safe levels for fish and inverts.

Materials needed to construct a filter for a 10 gallon tank:
- Quart size deli container with lid
- PVC pipe and tee or elbow to fit
- Polyester filter floss
- Scrubby, Easter grass, or other high surface area filter media
- Lava rock, pea gravel, Aragonite or other heavy, high surface area medium for ballast
- Drill and razor knife
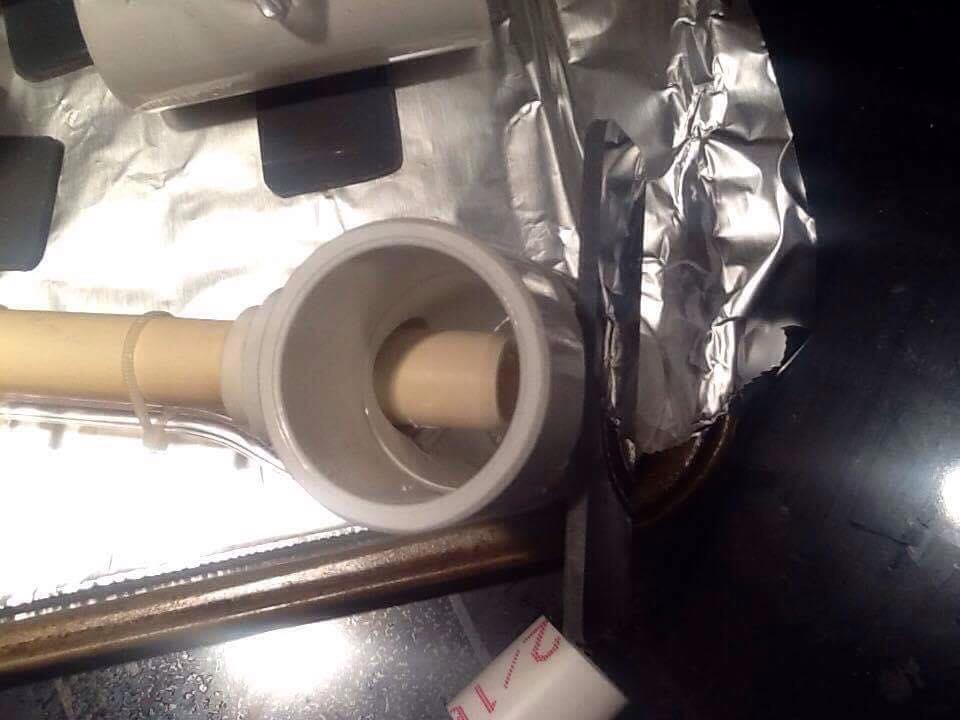
- Airline
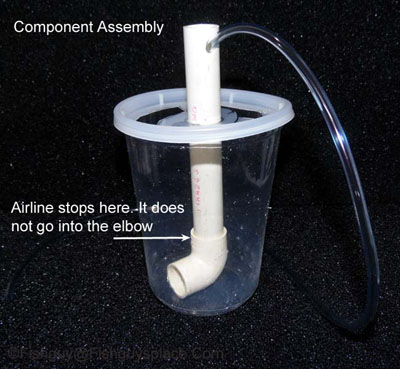
Cut the lift pipe and fitting assembly so that the top of the lift protrudes a couple inches out of the lid of the deli container used for the filter body. A tee fitting at the bottom end of the lift is best, but I had an elbow on hand here and that also works. Do not use any PVC glue or cleaner. They are toxic. Just securely push the pieces together and they will hold. Drill a hole for the airline near the top of the lift pipe, and cut a hole for the vertical pipe and some holes for water inlets in the lid of the deli container.
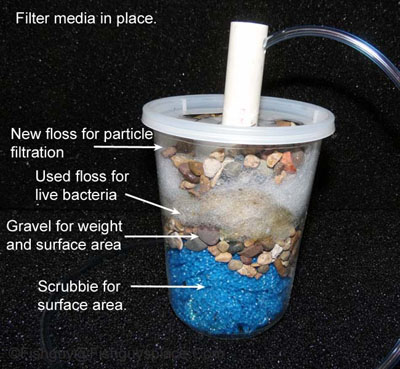
Now add the filter media. Here we use an unraveled scrubbie for surface area and to keep the elbow inlet on the bottom gravel free. Then gravel for weight to keep the filter stationary on the bottom. On top of that is the most important layer: used media from a working filter. This seeds the new filter with live bacteria. Then more floss and pebbles. Plastic Easter grass works well in these as it has a large surface area and can be bought for pennies after Easter and used throughout the year.
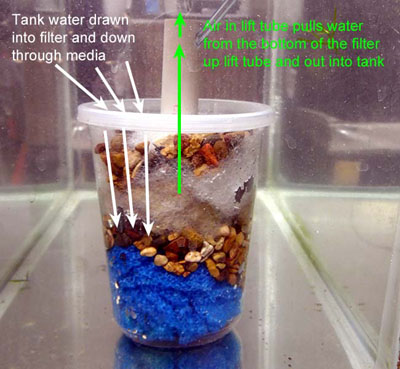
Tank water flows down into the top of the filter, down through the media where nitrifying bacteria reduce the ammonia content, then into the lift tube and up and back out into the tank. The column of air and water rising up in the lift tube create this flow. Nitrifying bacteria are aerobic, meaning the more oxygen they get the better they perform and reproduce. Flow through this filter can be increased by using a longer lift tube, or a lift tube with a greater diameter. Filter capacity is also increased by using a larger container. Cut off two liter soda bottles work very well in 20 gallon tanks.
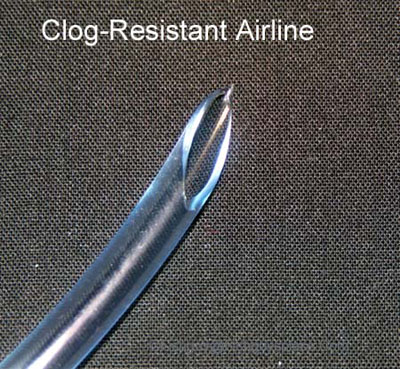
The air here comes directly out of the open end of the airline. Airstones reduce the bubbling sounds produced by the filter, but also tend to clog up requiring frequent replacement. Even the cut end of an airline can clog, but this is overcome by cutting off the end on a diagonal bias, giving an ovoid as opposed to a circular opening. This diagonal cut also works to keep the airlines in brine shrimp hatcheries from filling with caked salt and stopping up.
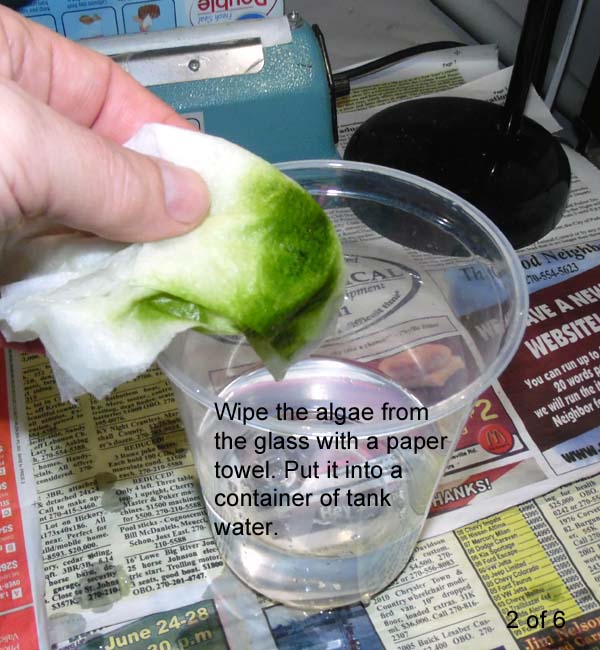
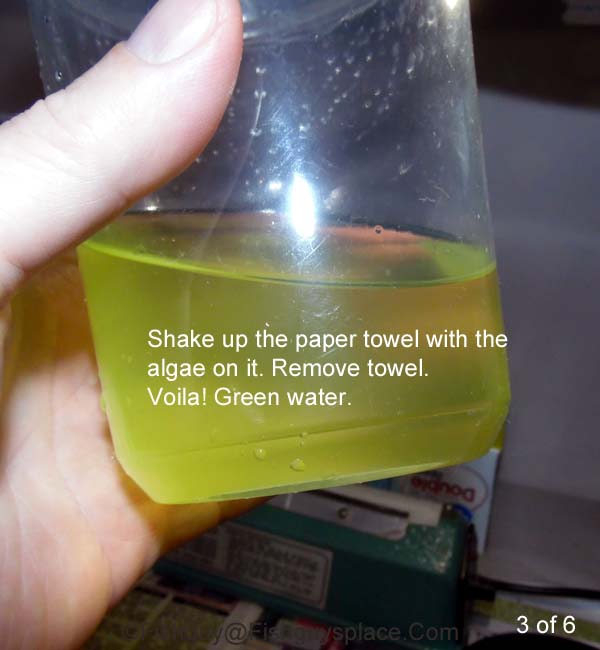
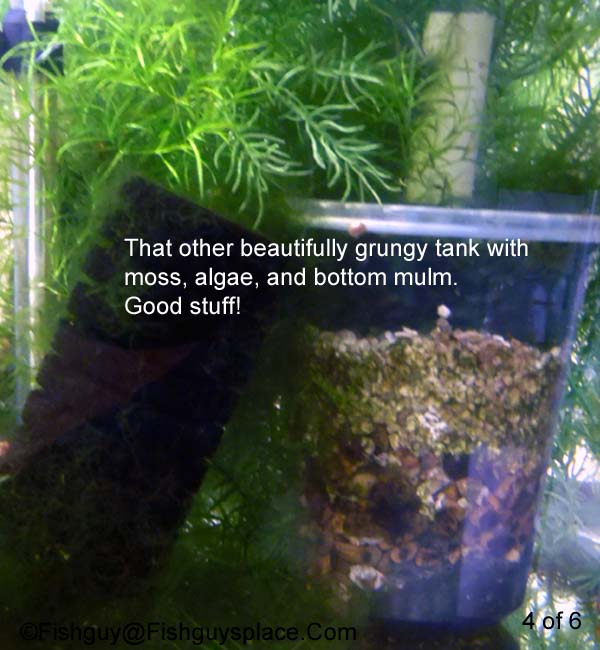
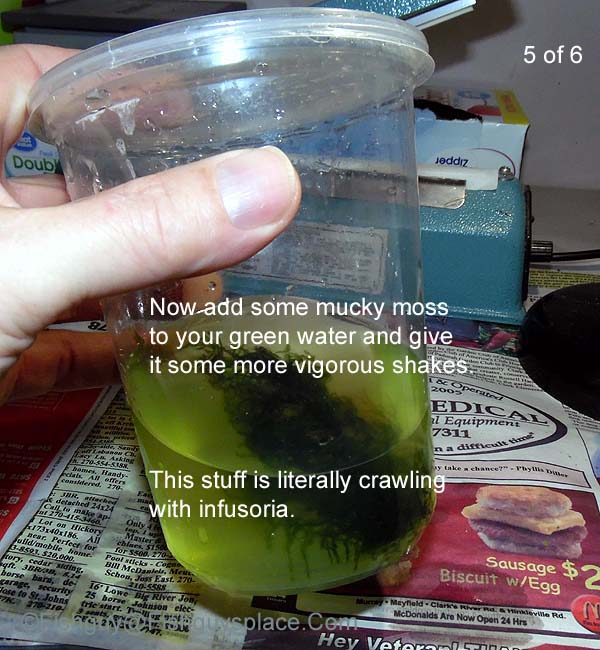
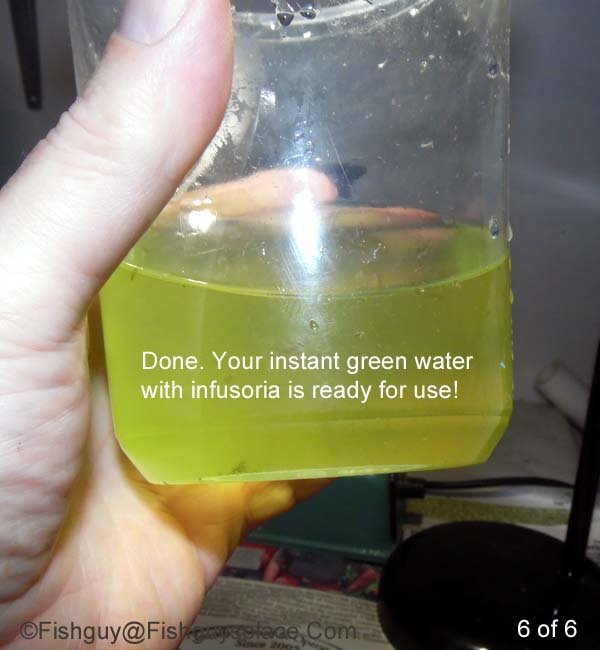
Back To TopFry Food 911 - Instant Green Water
It is important to have the proper, small live foods on hand prior to spawning your fish. That said, in the real world I regularly get 911 emails like this: "Help! My fish spawned and I have no food for the fry!"
If you're going to have really small fry on hand on a regular basis, you should consider keeping a tank or container of green water going to provide first food as needed. If you're caught by surprise and don't have any green water on hand, there is a way to quickly produce a reasonable facsimile. The pictorial here below shows how.

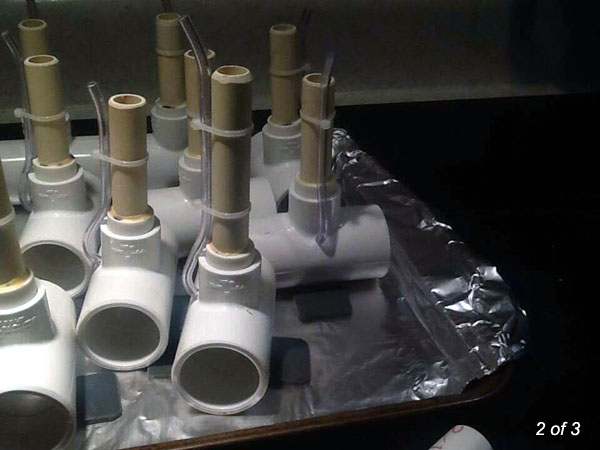
Mini Tank Filter - A few twists on an old standby design.
Note: This design for small filters suitable for fry containers and tanks, and the pictures and text below are compliments of Master Aquarist, Lee Van Hyfte.
Materials for this project.
- 1"-1/2" T
- Used 1/2" PVC cut to 1" long
- Used 1/2" CPVC cut to 4"
- The CPVC pipe was slid through the 1/2" PVC to form a collar to adapt to the 1/2" PVC joint.
- The collar was welded in place.
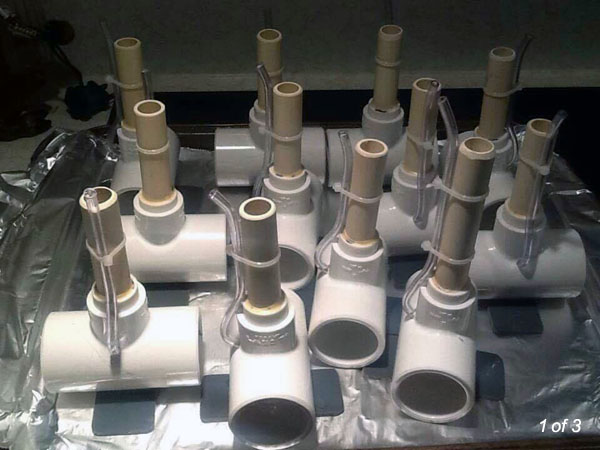
I utilized the CPVC for the smaller inside diameter than the 1/2" PVC schedule 40. Allowing more lift in the tube. The T was ground down on bottom and a piece of flat PVC welded in place creating a stable upright platform. Foam piece will be cut to size and placed in the ends of the T. Voila mini filters for 1.5gal fry tanks tubs. Now I just have to wait for paint to dry, well PVC cement anyway.
Spawning Nothobranchius And Collecting The Eggs
Here is a short, illustrated tutorial describing how I spawn Nothobranchius and collect the eggs. With time and experience, every hobbyist develops his or her own methods. This is intended as a basic reference for those new to keeping and spawning annual killifish of the genus Nothobranchius. It is by no means the only way, just one way.
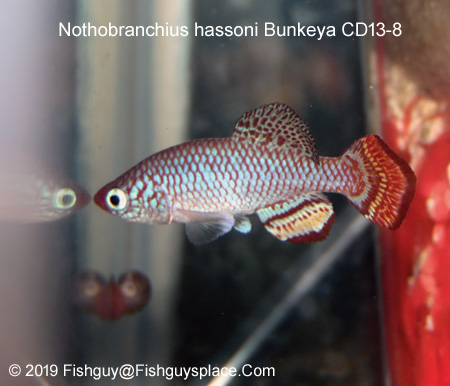
The fish spawning for this tutorial are Nothobranchius hassoni. They are beautiful, relatively easy, and quite peaceful for a Notho. I obtained the eggs from a European breeder on AquaBid - thanks Francesco!
They grew out easily, and are about four months old in this picture. I have two pairs in the tank, and can get away with that because they are relatively peaceful. Usually a male and a couple females works best.
You can also put spawning jars in something like a ten gallon with a sizable population to spread the aggression out. The alphas will take over the jars and you can get a lot of eggs that way.
HERE is a video of a group N. korthausae spawning.
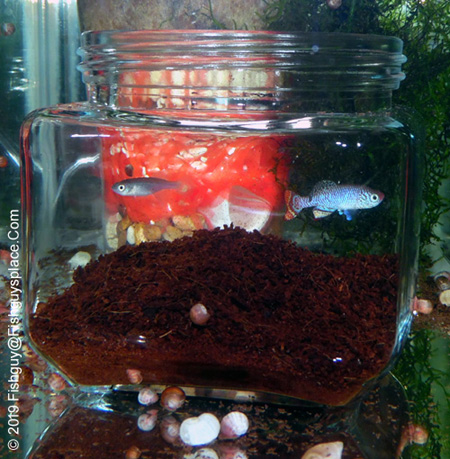
This is a typical Notho setup with a jar of coir in a five gallon tank. Peat is the traditional spawning medium, but I prefer coir and it works well for me. Filter is homebrew, and the room is kept at about 75F. Snails are included as janitors. This jar has been in place for two to three weeks. To keep food out of the coir, where it rots and fouls it, I just drop a lid on the jar when feeding and remove it after.
Unless it is totally waterlogged, coir wants to float. Prepare coir for use by putting it in a gallon zip-lok or covered container full of water. Agitate periodically to remove air and let it soak for a few days to saturate.
Put a little more soaked coir than you want to use into the spawning jar and fill to the brim. It will be cloudy with some floating. Pour this off, and repeat until there is no more floating coir and water is relatively clear. Fill the jar to the very brim one last time and let it settle. Put lid on spawning jar and gently lower into tank. Remove lid and it should be good to go.
The fish quickly discover the spawning jar and begin to use it. Give them two or three weeks after you notice spawning activity, or evidence of it by the coir frequently being rearranged, then pull the jar.
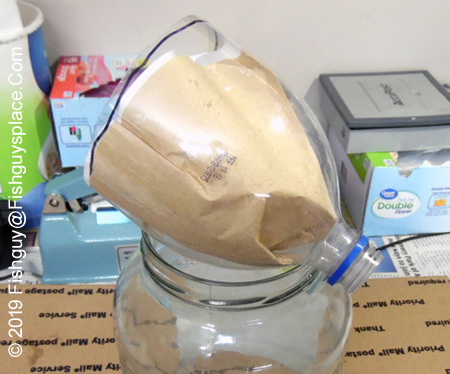
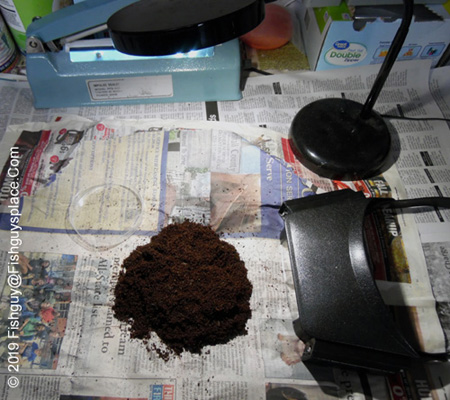
The next task is harvesting the coir with eggs in it. I use a big funnel made by cutting the top off a two liter soda bottle. This is a useful tool to keep around the fish room. You can also use a large standard funnel if you have one.
Line the funnel with a couple #4 coffee filters, and put it on a catch jar. It's a perfect fit for a one gallon jar you can sometimes scrounge from restaurants. This funnel and coffee filter arrangement is also good for harvesting vinegar eels.
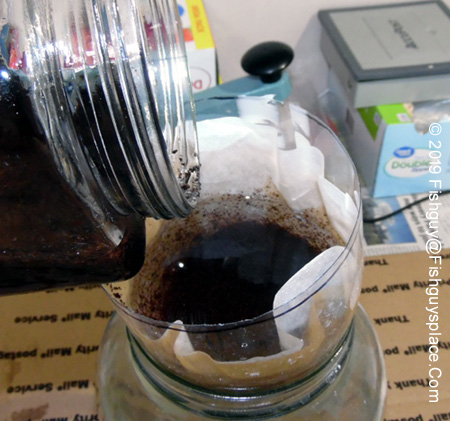
Stir up the coir in the jar and pour into the funnel. Keep a pitcher of water at hand to add more water to the jar, stir and pour until all the coir is in the funnel. Leave this to drain for an hour or two.
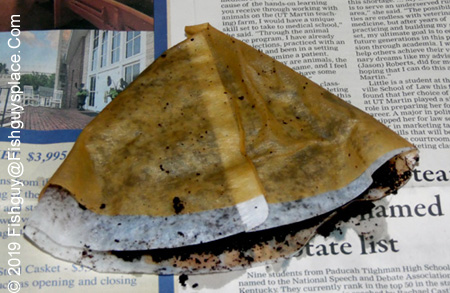
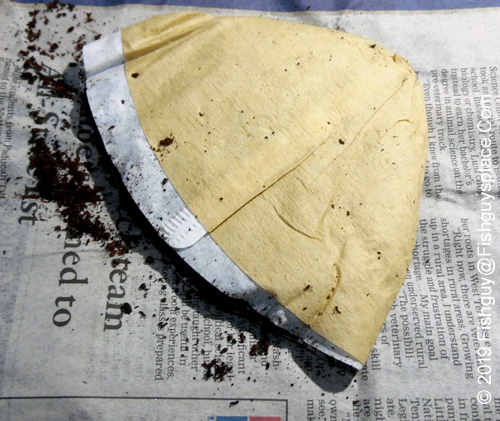
Now get the excess water out of the coir. Lay the filter paper and coir flat on a couple sheets of newspaper and flatten it out. Then fold the paper up around it to make a packet.
Once the coir is securely wrapped, put a rubber band around the packet and set it aside. The more paper around it, the more moisture it will wick out of the coir. The longer the coir stays in the wrapping, the dryer it gets. Don't worry about this damaging the eggs. They are among the least fragile kilifish eggs.
Keep the coir wrapped for anywhere from a few hours to a day or so, then open it up. Determining the proper moisture level is challenging for new breeders.
The coir should be moist. This means somewhere between soaking wet and bone dry. A common analogy is to get it the moisture level of pipe tobacco, which doesn't mean much to many people today.
If you squeeze it together, it should think about clumping, but not be wet enough to do so. No water should come out when it is gently compressed. Getting this right automatically is a skill developed as you go, so don't stress over it now.
I forgot about it, and let the coir packet here get too dry. At this point that is easily corrected by adding a bit of moisture.
Start the egg picking process by spreading the coir out on a sheet of newspaper. Mine was too dry, so I sprayed it with tap water from a spray bottle. Sprayed then worked it in thoroughly until it got to just-moist throughout. You can get a spray bottle at the $store, and it is quite useful in the fish room.
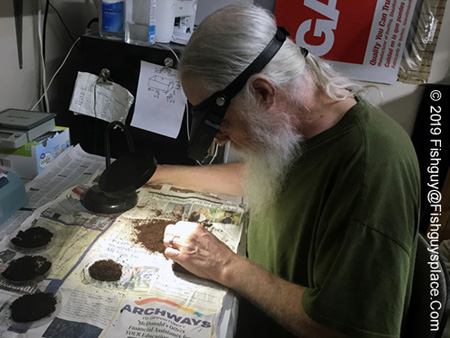
My egg picking setup includes: a gooseneck LED lamp for light without heat, petri dish for eggs, and what my wife calls my geek headset. My eyes aren't what they once were, so this wearable magnifier from Harbor Freight is quite useful on a daily basis in the fish room, and when picking eggs.
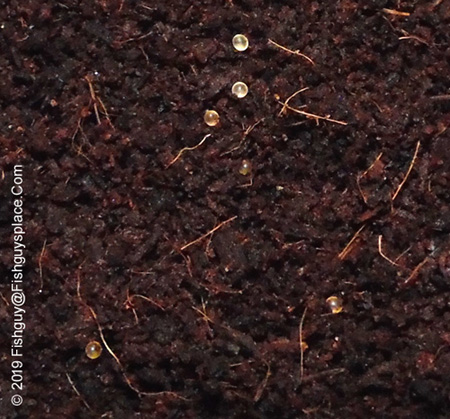
Here is what you are looking for in the coir! These little jewels will be spread throughout. Some species produce clear eggs, some amber colored. Eggs vary in size by species, around a roughly 1mm average size.
Discard any cloudy or white eggs you come across. If you have healthy, young breeders there should be relativey few unfertilized eggs. In my experience, nothos have a higher rate of good eggs to bad than non-annuals.
Here I am picking eggs. This is big fun, and is like an easter egg hunt for big people! You'll develop your own method of searching through the coir as you go. I pick the surface then spread it flatter with my palm. When it has got very spread out, I gather it into a pile, pick up the pile and put it back down upside down.
If it gets too dry while you are working it, you can give it a shot or two with the spray bottle.
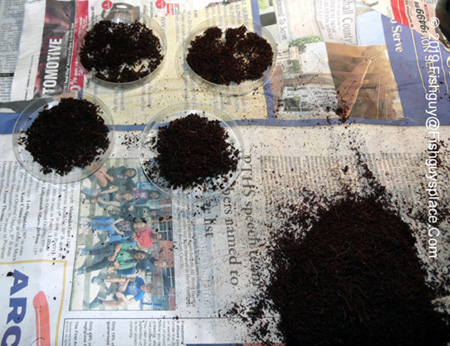
I went with 25 eggs per dish and ended up quite lucky with at least 99 eggs in four dishes. Every pick is a gentle pinch of coir and egg, resulting in the coir and eggs in these dishes. First picks can sometimes be more than one egg if there is an unseen egg close by the egg you are picking.

After picking as many eggs as can be found, leftover coir is distributed evenly into the four dishes. This picks up any missed eggs, and the additional coir helps maintain a stable moisture level.
Worth mentioning is that you don't nesessarily have to pick the eggs. I pick them because I'm a bit OCD and I also sell/distribute them. If you are going to hatch the eggs yourself, you could just take a look at the coir to verify there are eggs present, then store it.

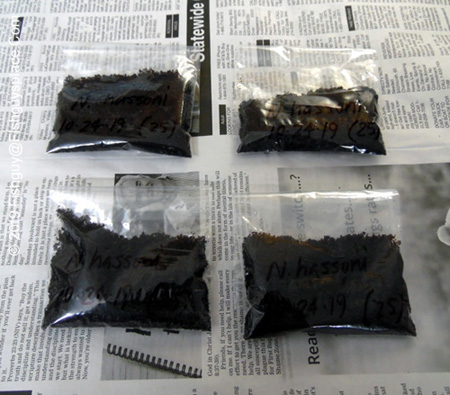
Now bag the coir for incubation. I'm using small zip-loks, one dish (25 eggs) per bag. The easiest way to get coir and eggs into the bags without losing any is to put a fold into a piece of paper and use it to pour the eggs and coir in. I label each bag with a Sharpie, stating species, number of eggs, and collection date.
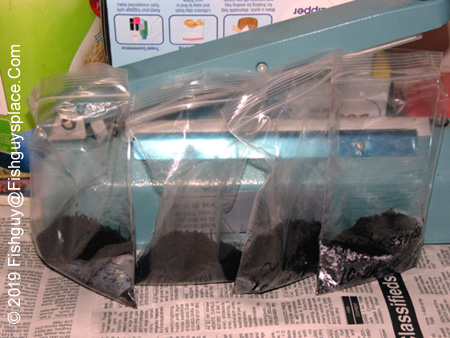
Eggs are bagged and ready for storage. I'll seal all of these into a larger bag that goes into a drawer I use for incubation. These will go two months before I start checking weekly or bi-weekly for eyes. There are tables and other references available online for incubation times.
HERE is a PDF with Nothobranchius incubation times. As with all things in the hobby, these are aproximations and and should be used as such. Always check eggs for development visually as the only reliable means of telling when they are ready. When they are looking back at you, they are ready. A magnifying glass for this and other uses is a must have for the fish room.
Proper moisture level for storage is always a concern for beginners. Here is one last tip addressing that. Earlier in this tutorial I added moisture after letting the coir get too dry. After the eggs got bagged up, I noticed significant condensation inside the bags, indicating it was a bit wetter than optimal. Easily solved by leaving the bags open for a bit to let the excess evaporate!
Force Hatching Non-Annual Killifish Eggs
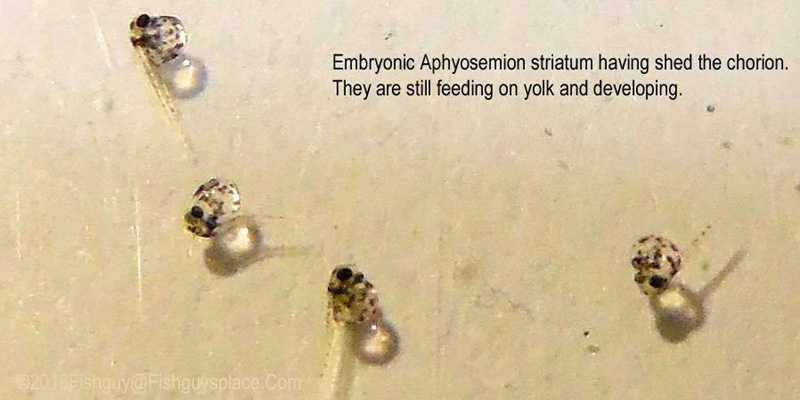
So you are new to breeding killies and your first batch of non-annual eggs is all eyed up and ready to hatch. Maybe a few hatch, then nothing. The eggs just sit and the fry appear to be trapped within. Is that panic in those tiny eyeballs?
If the fry are not freed when embryonic developemnt is complete, they can perish or come out as belly sliders. Though thin, the chorion (egg membrane) is quite strong and must be weakened by a hatching enzyme (chorionase) released from the fry's hatching glands. The chorion breaks open, freeing the fry, as a result of increased fry movement and concurrent release of the hatching enzyme.
The biochemistry is complex and varies by genus and species, but in simple terms here is how it works: The mature fry now needs more oxygen than it can get through the egg membrane. This causes increased movement, and the release of chorionase weakening the egg membrane. The triggers are both chemical and kinetic. Bam! A fry is born.
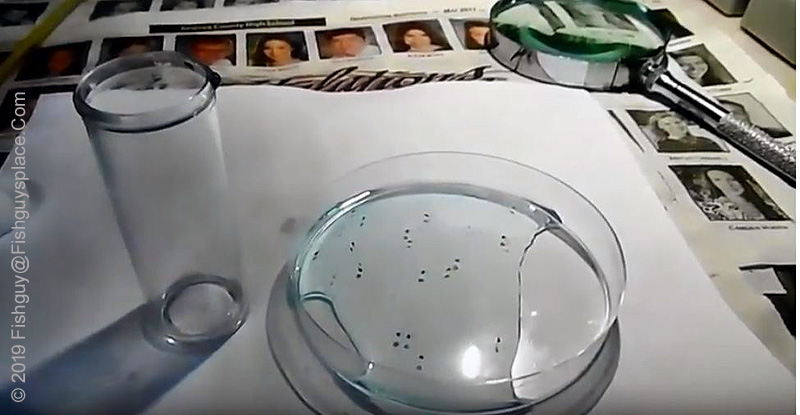
The process also explains why the old trick presented here, and variations on it, really work. Turns out we have had it right for a long time now. To force hatch eggs that look ready but aren't hatching, put the eggs into a little plastic vial or capped jar and carry them around in your pocket for a few hours. They aren't as fragile as you might think, and I also gently upend the vial a few times to stir things up.
Body heat increases fry metabolism and oxygen need, causing increased movement within the egg. Walking around with the vial in pocket adds more movement. If that doesn't do it, you can exhale into the vial and carry it around again. Exhaing into the vial increases CO2, decreasing oxygen, and increasing fry heart rate and movement. Sometimes a dab of microworms added to it can also help trigger a hatch.
How does all that square up with the science? Each of these strategies decreases the the avaialable oxygen to the fry within the egg, increases movement, and causes a release of the chorion dissolving enzyme. The eggs that don't hatch just aren't quite ready yet.
HERE is a video showing this technique working on some stubborn eggs.
That the fry are immediately, actively free swimming when poured from the vial verifies that it was time to break them out!
� 2025 Fishguy's Place - All Rights Reserved